> ## Documentation Index
> Fetch the complete documentation index at: https://docs.insighto.ai/llms.txt
> Use this file to discover all available pages before exploring further.
# Whatsapp Setup
## Create Your Meta Business Account
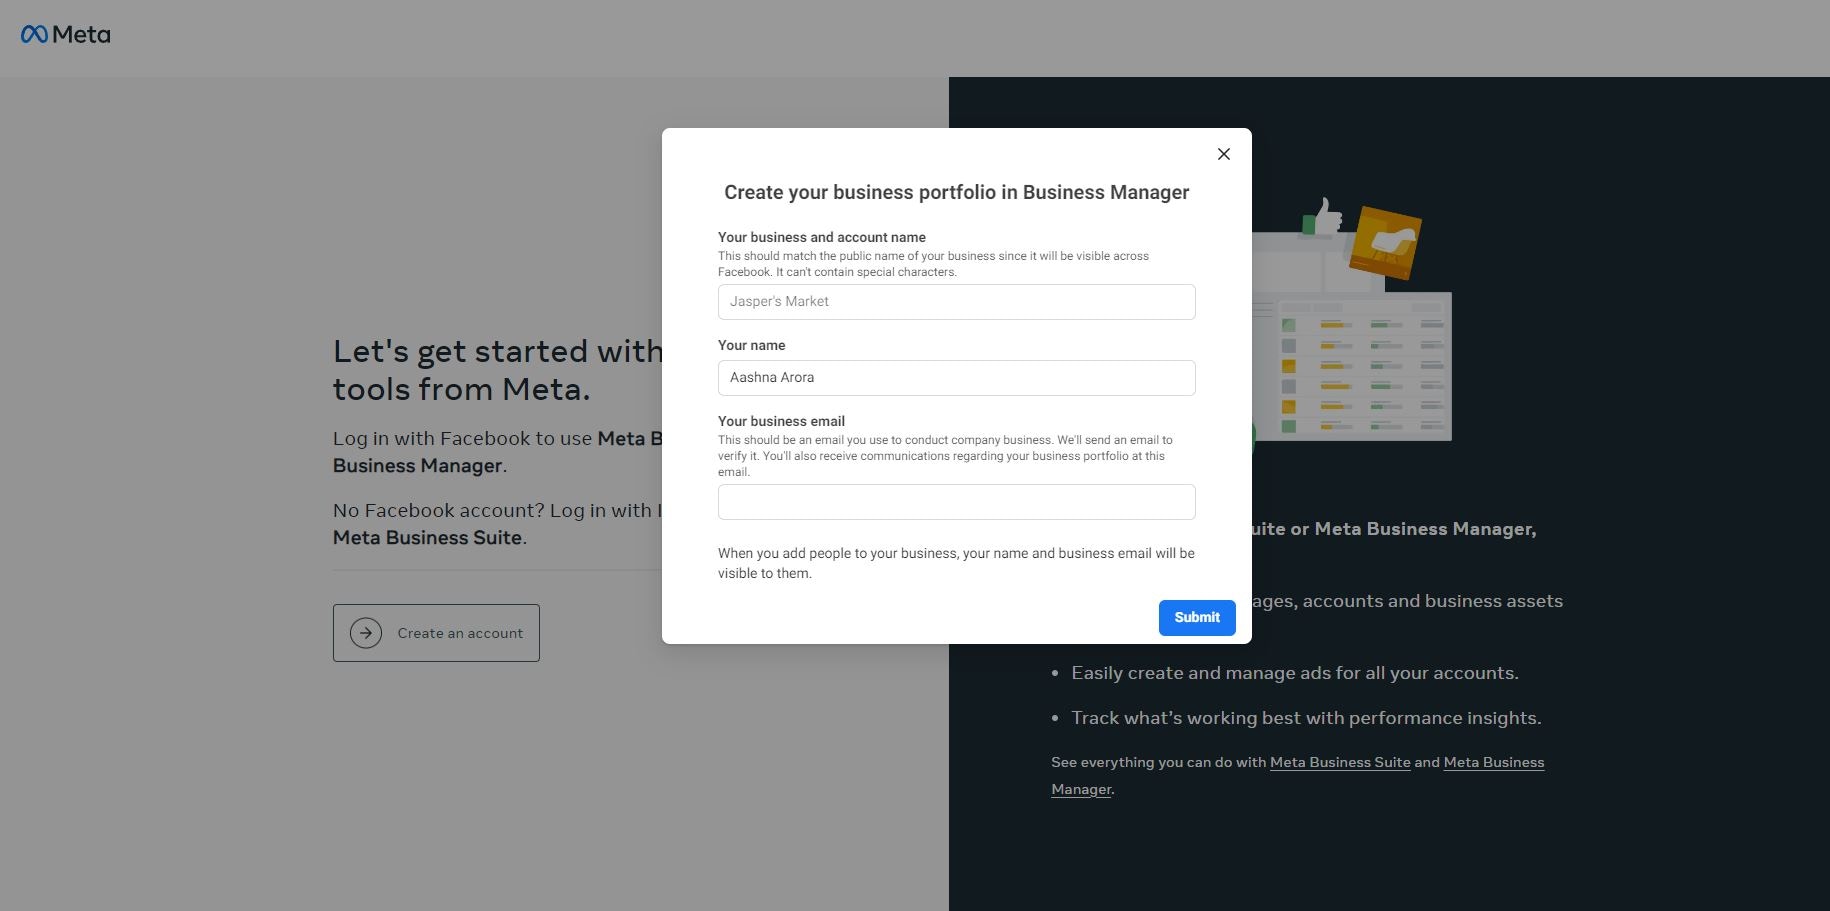
1. Sign up with Facebook Business Account
To begin, go to [https://business.facebook.com/](https://business.facebook.com/) and click “Create an account.” You’ll be prompted to enter your full name, business name, work email address, and other business details. After filling out the form, click “Submit” to successfully create your Meta Business account.
 ## Create a Meta (Facebook) Developer App
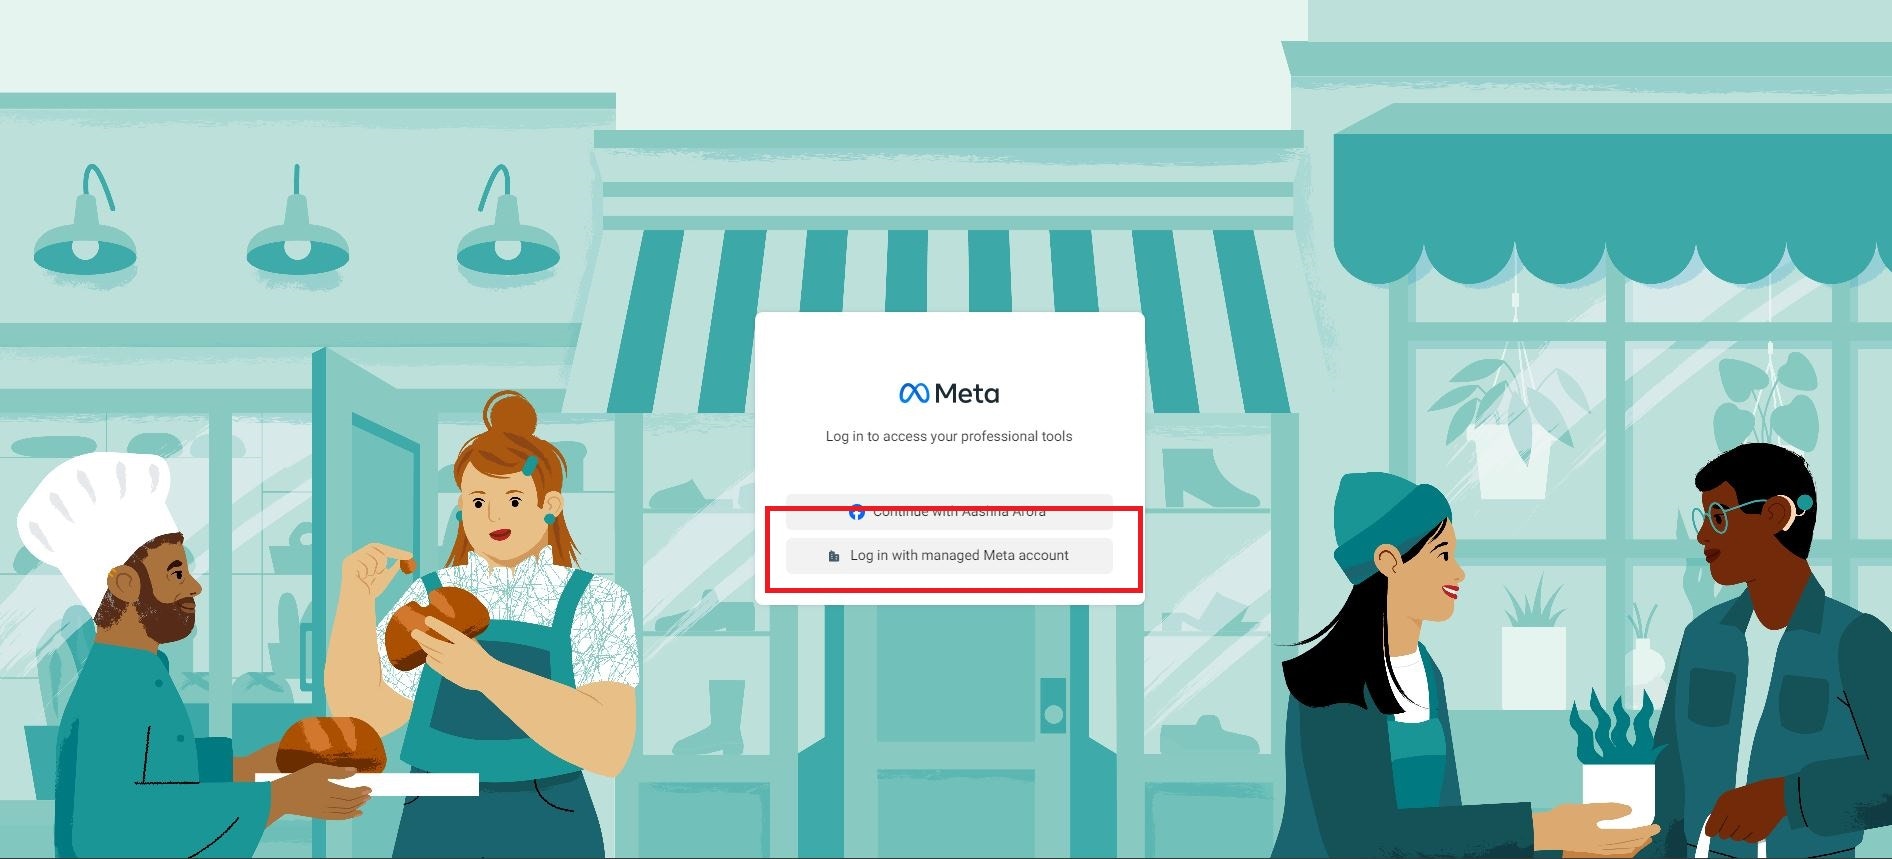
2. Access the Meta Developer Console
Visit [https://developers.facebook.com/](https://developers.facebook.com/) and log in with your Meta Developer account.
## Create a Meta (Facebook) Developer App
2. Access the Meta Developer Console
Visit [https://developers.facebook.com/](https://developers.facebook.com/) and log in with your Meta Developer account.
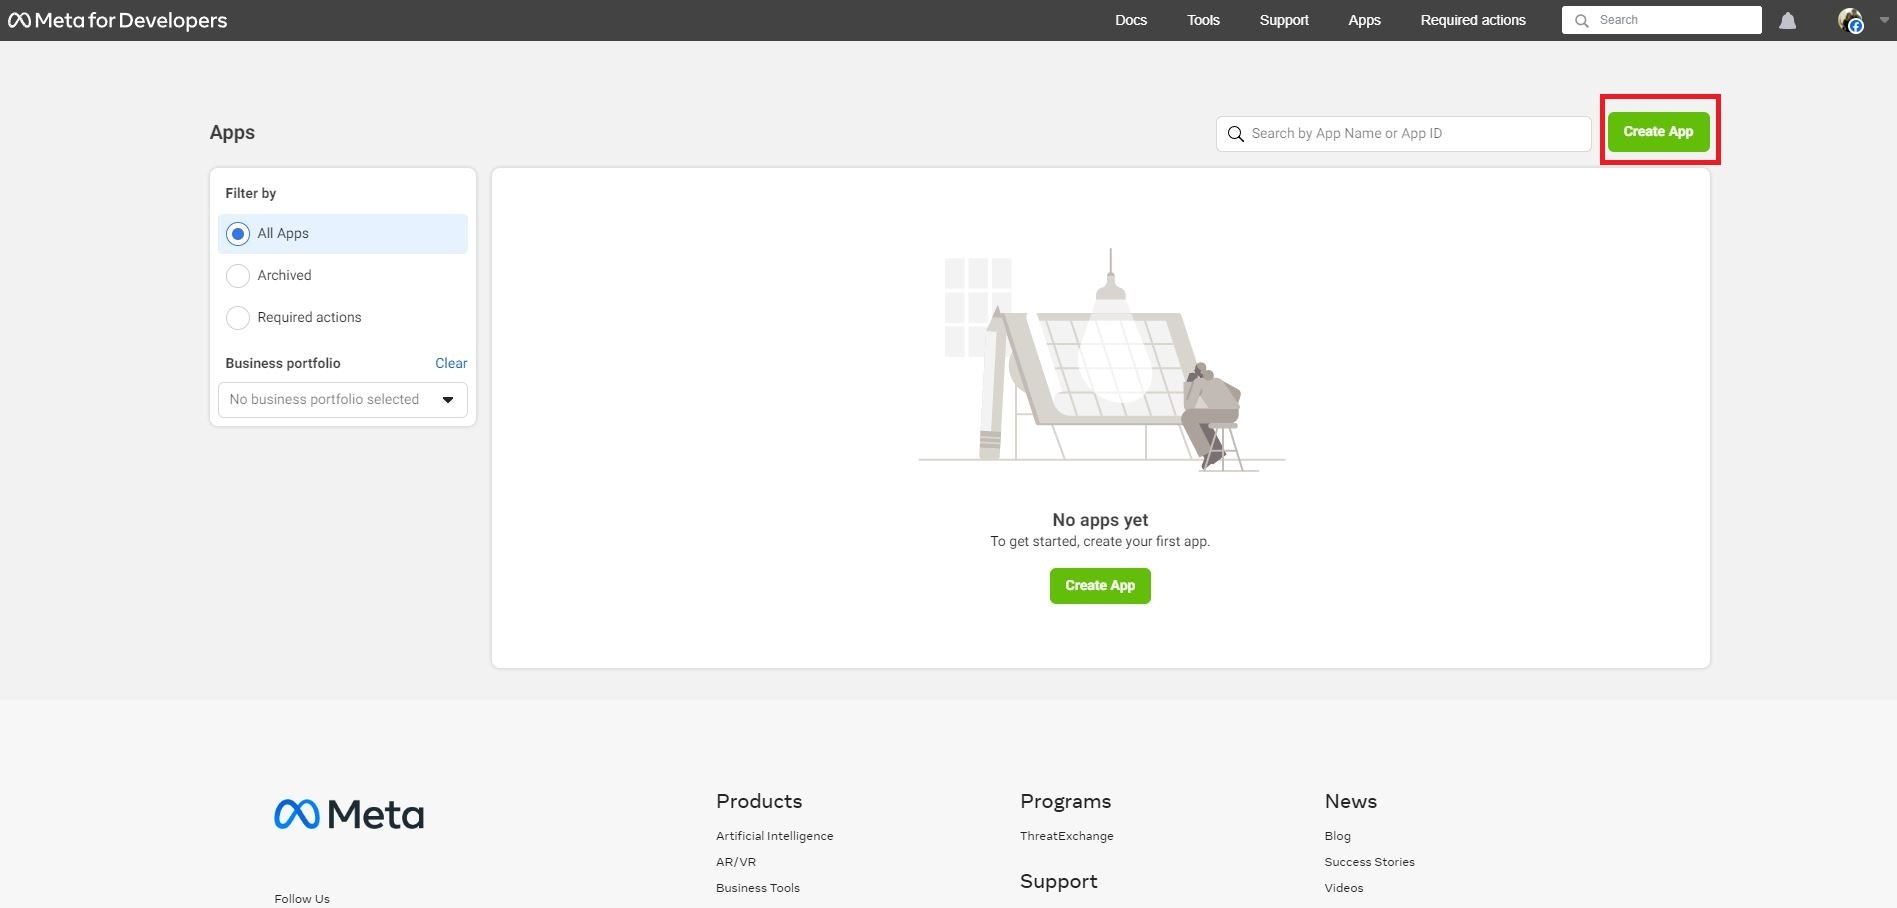
 3. Create a New App
Navigate to the top menu and click “My Apps”, then select “Create App.”
3. Create a New App
Navigate to the top menu and click “My Apps”, then select “Create App.”
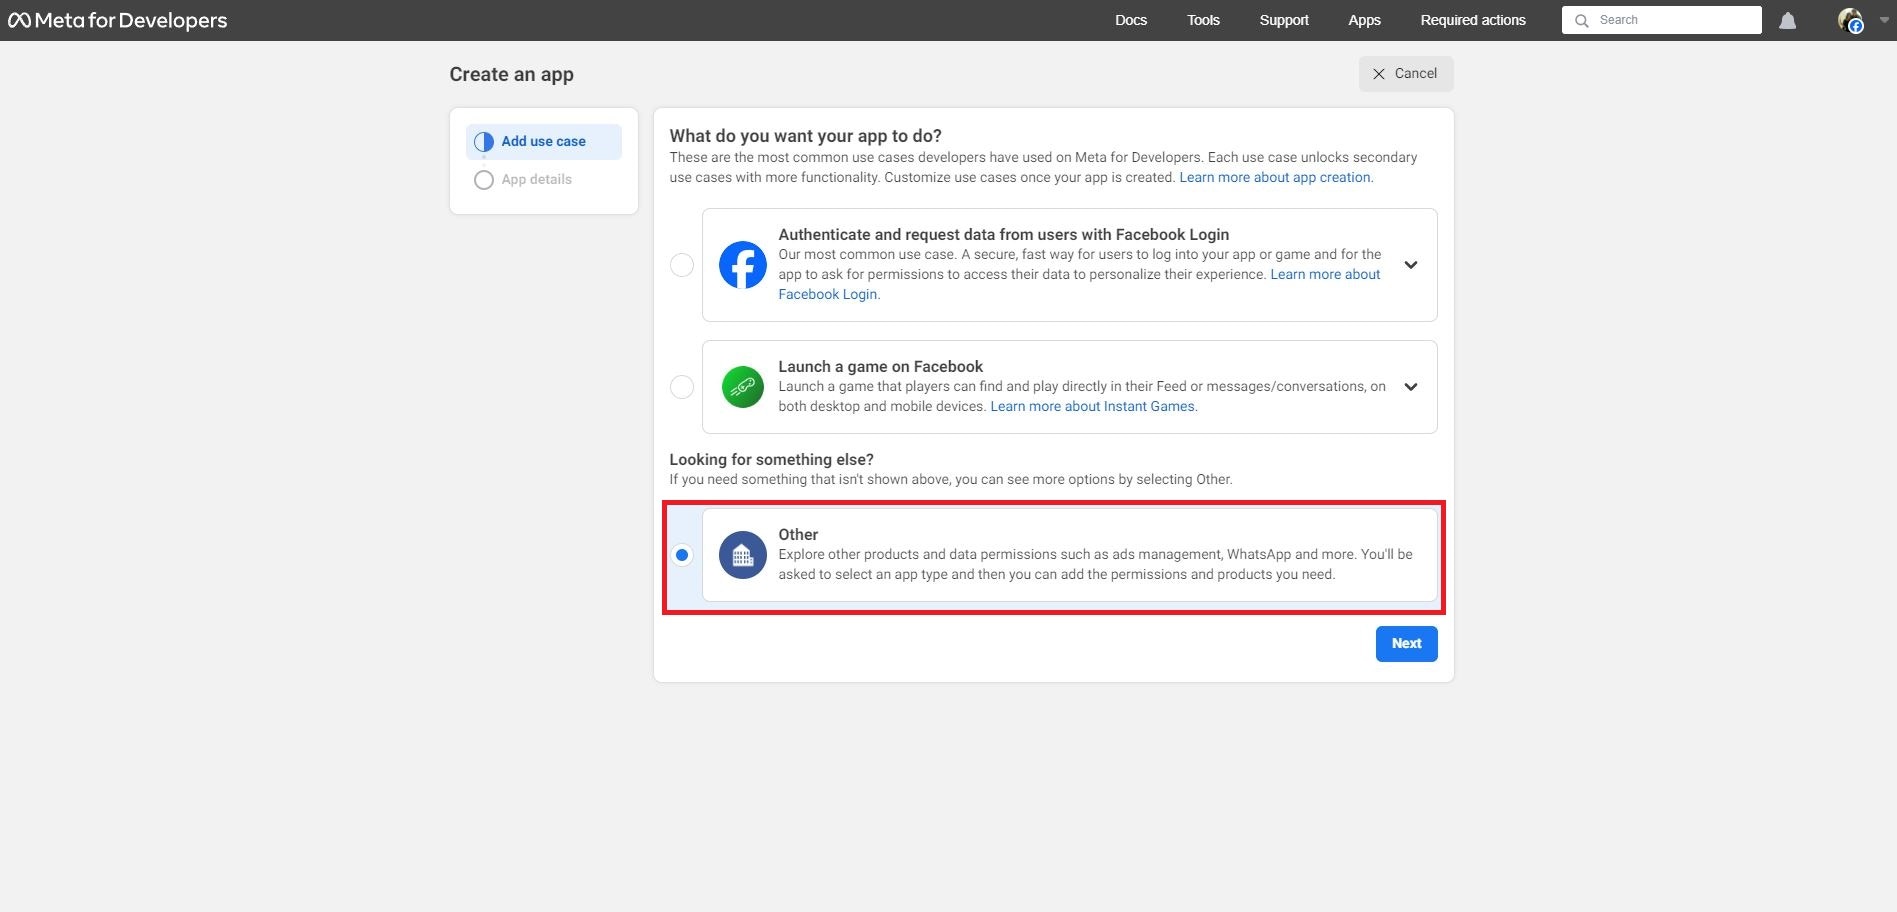
 4. Choose Use Case
On the next screen, select “Other” as the use case, and click “Next.”
4. Choose Use Case
On the next screen, select “Other” as the use case, and click “Next.”
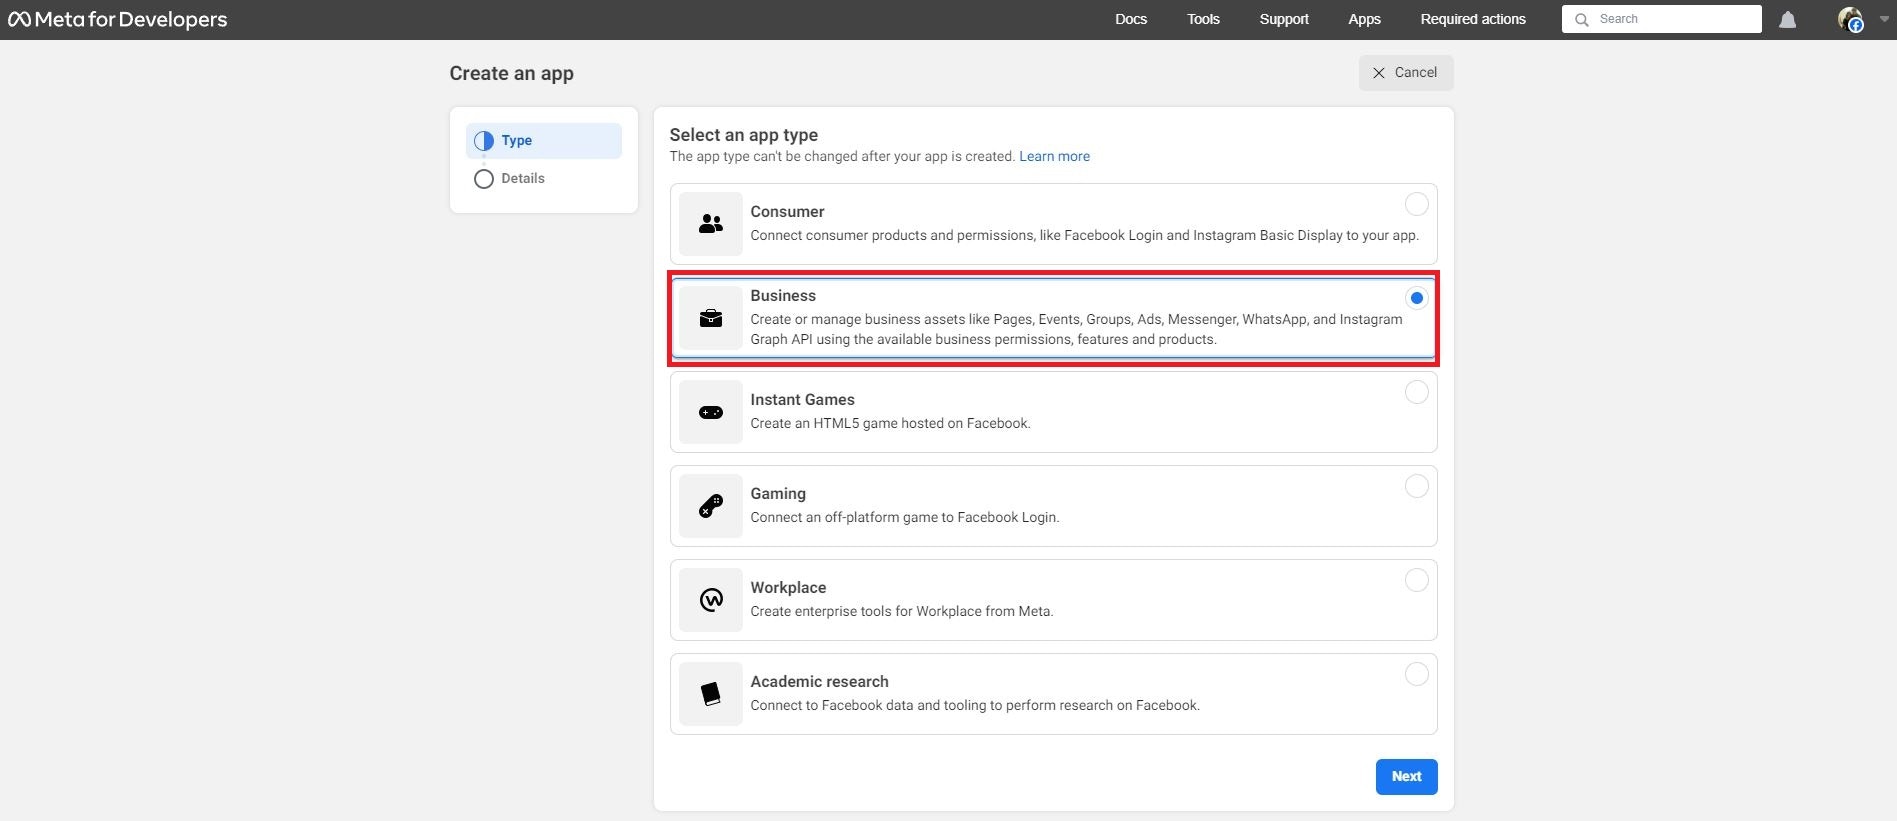
 5. Select App Type
Choose “Business” as the app type and click “Next.”
5. Select App Type
Choose “Business” as the app type and click “Next.”
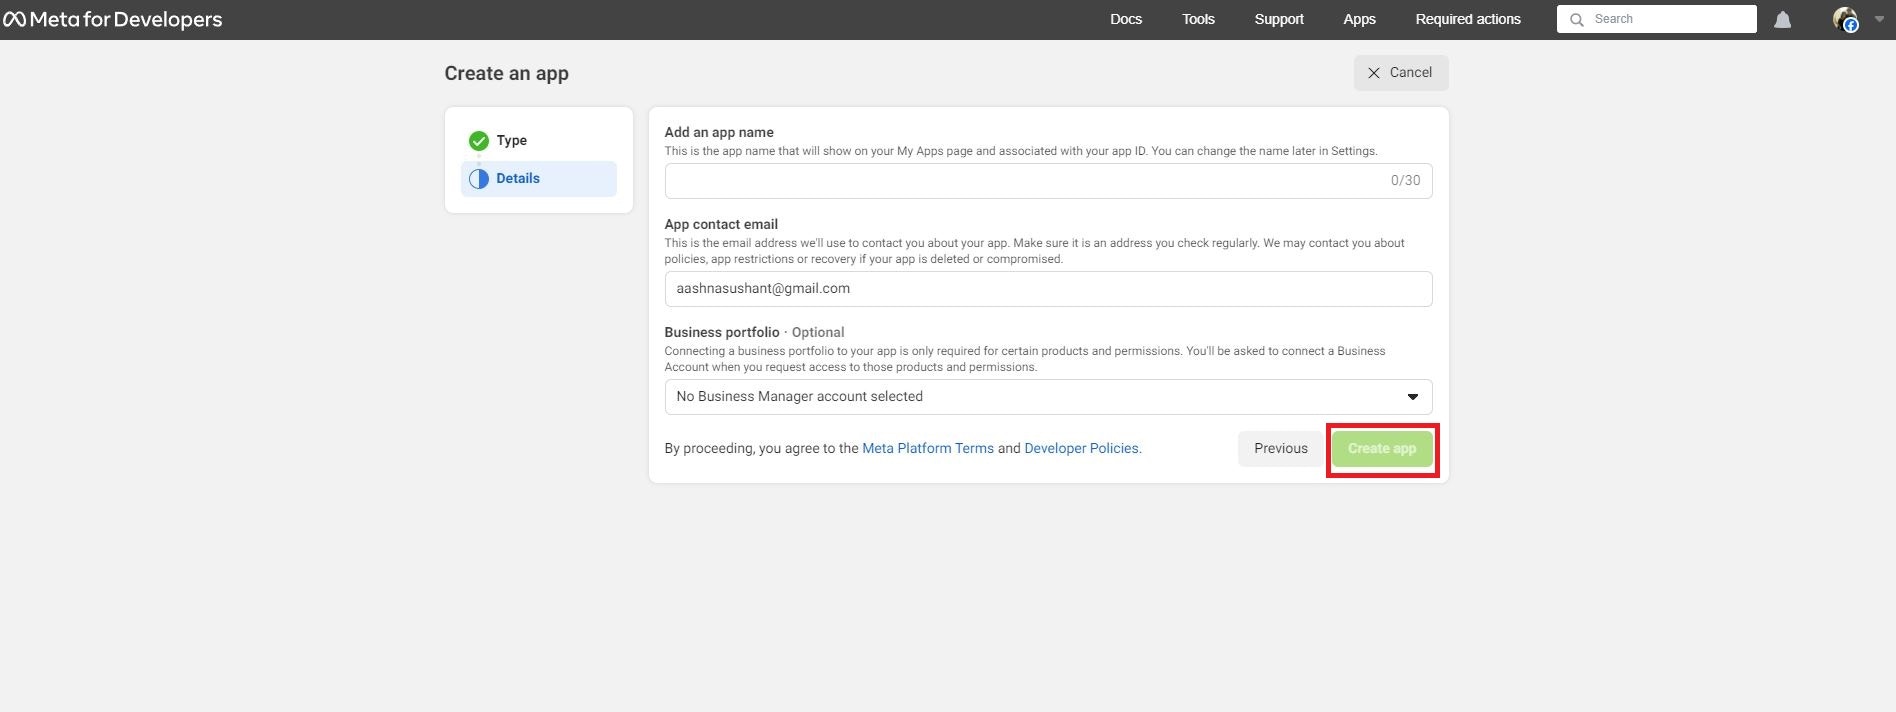
 6. Fill App Details
Enter the required app details including:
* App Name
* Contact Email
* Select your Business Account from the dropdown
Then click “Create App” to finalize app creation.
6. Fill App Details
Enter the required app details including:
* App Name
* Contact Email
* Select your Business Account from the dropdown
Then click “Create App” to finalize app creation.
 ## Set Up the Meta App for WhatsApp Integration
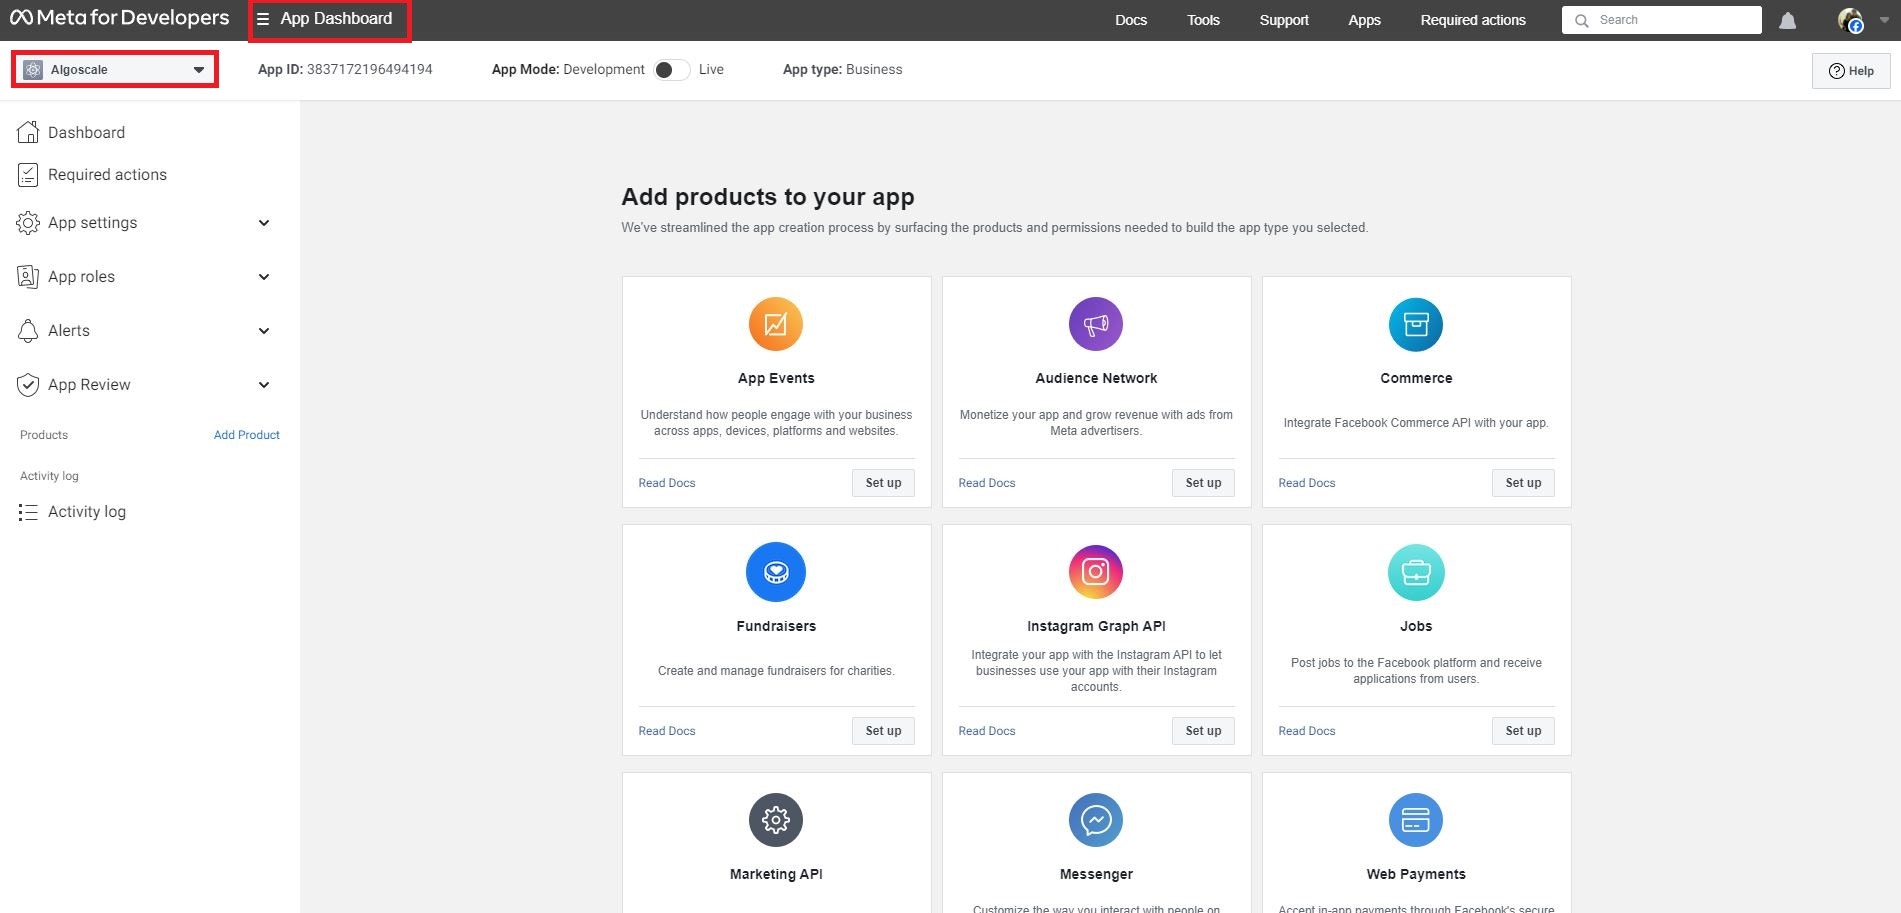
7. Open Your App Dashboard
In the Meta Developer Console, select the app you just created to open its dashboard.
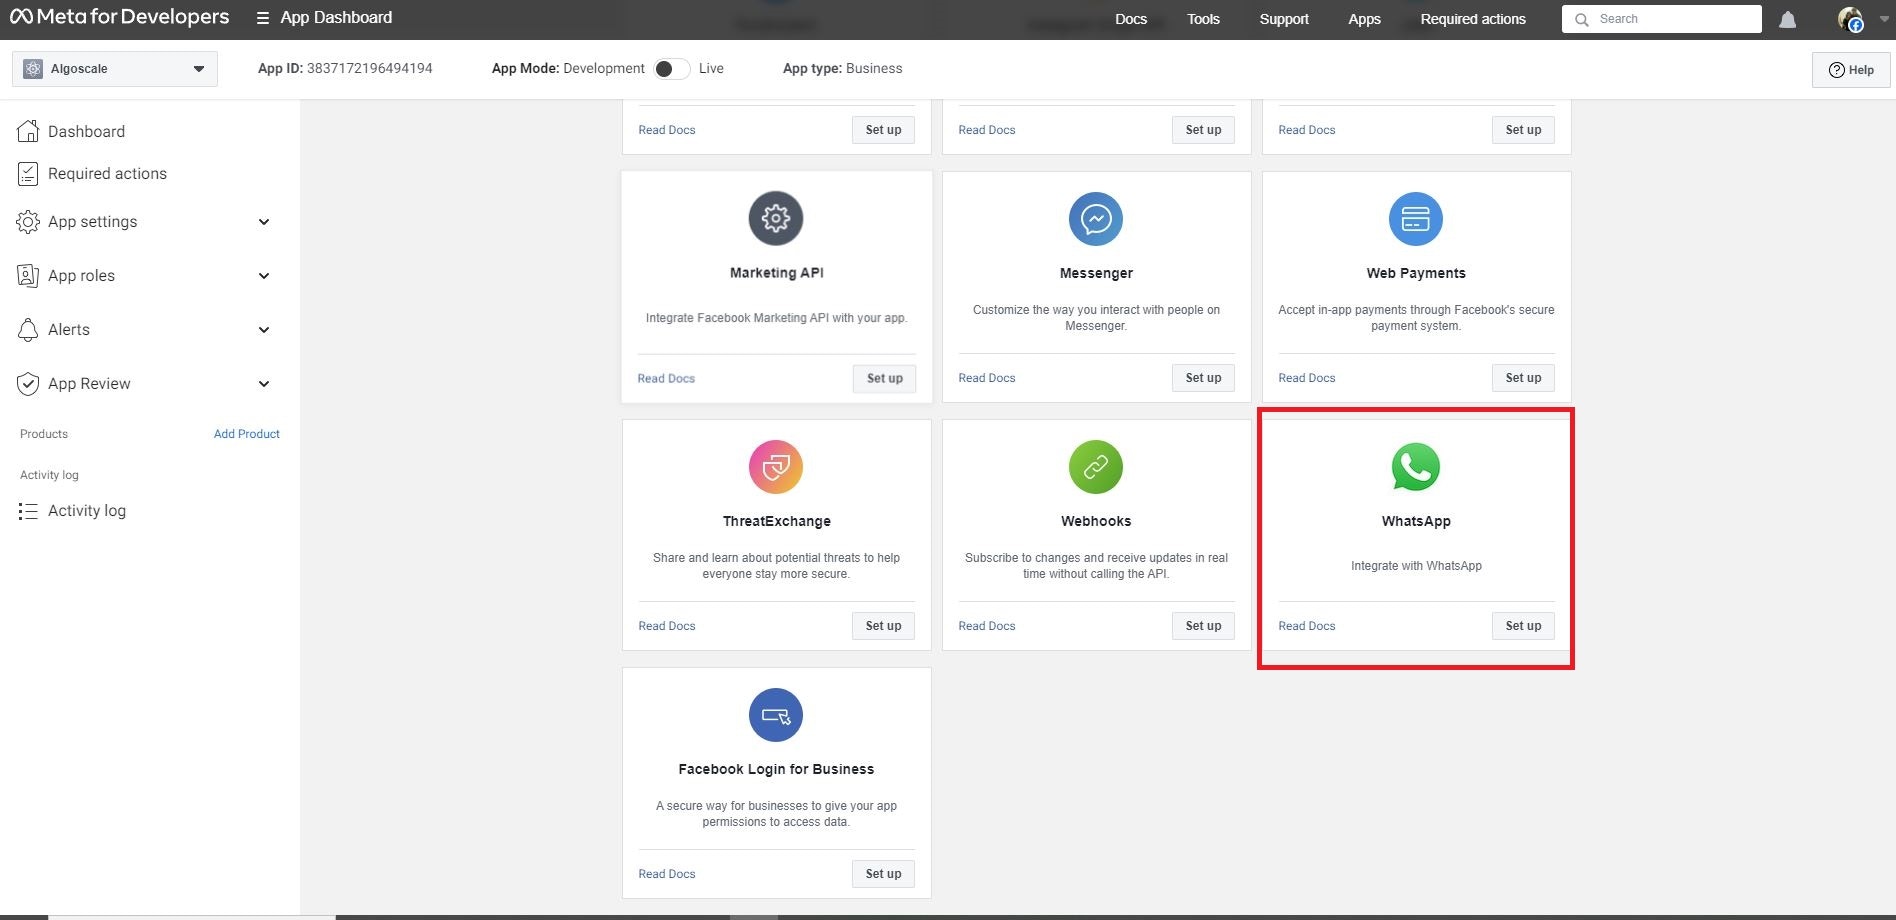
**Add WhatsApp Product**
Under “Add products to your app”, locate WhatsApp and click “Set up.”
## Set Up the Meta App for WhatsApp Integration
7. Open Your App Dashboard
In the Meta Developer Console, select the app you just created to open its dashboard.
**Add WhatsApp Product**
Under “Add products to your app”, locate WhatsApp and click “Set up.”
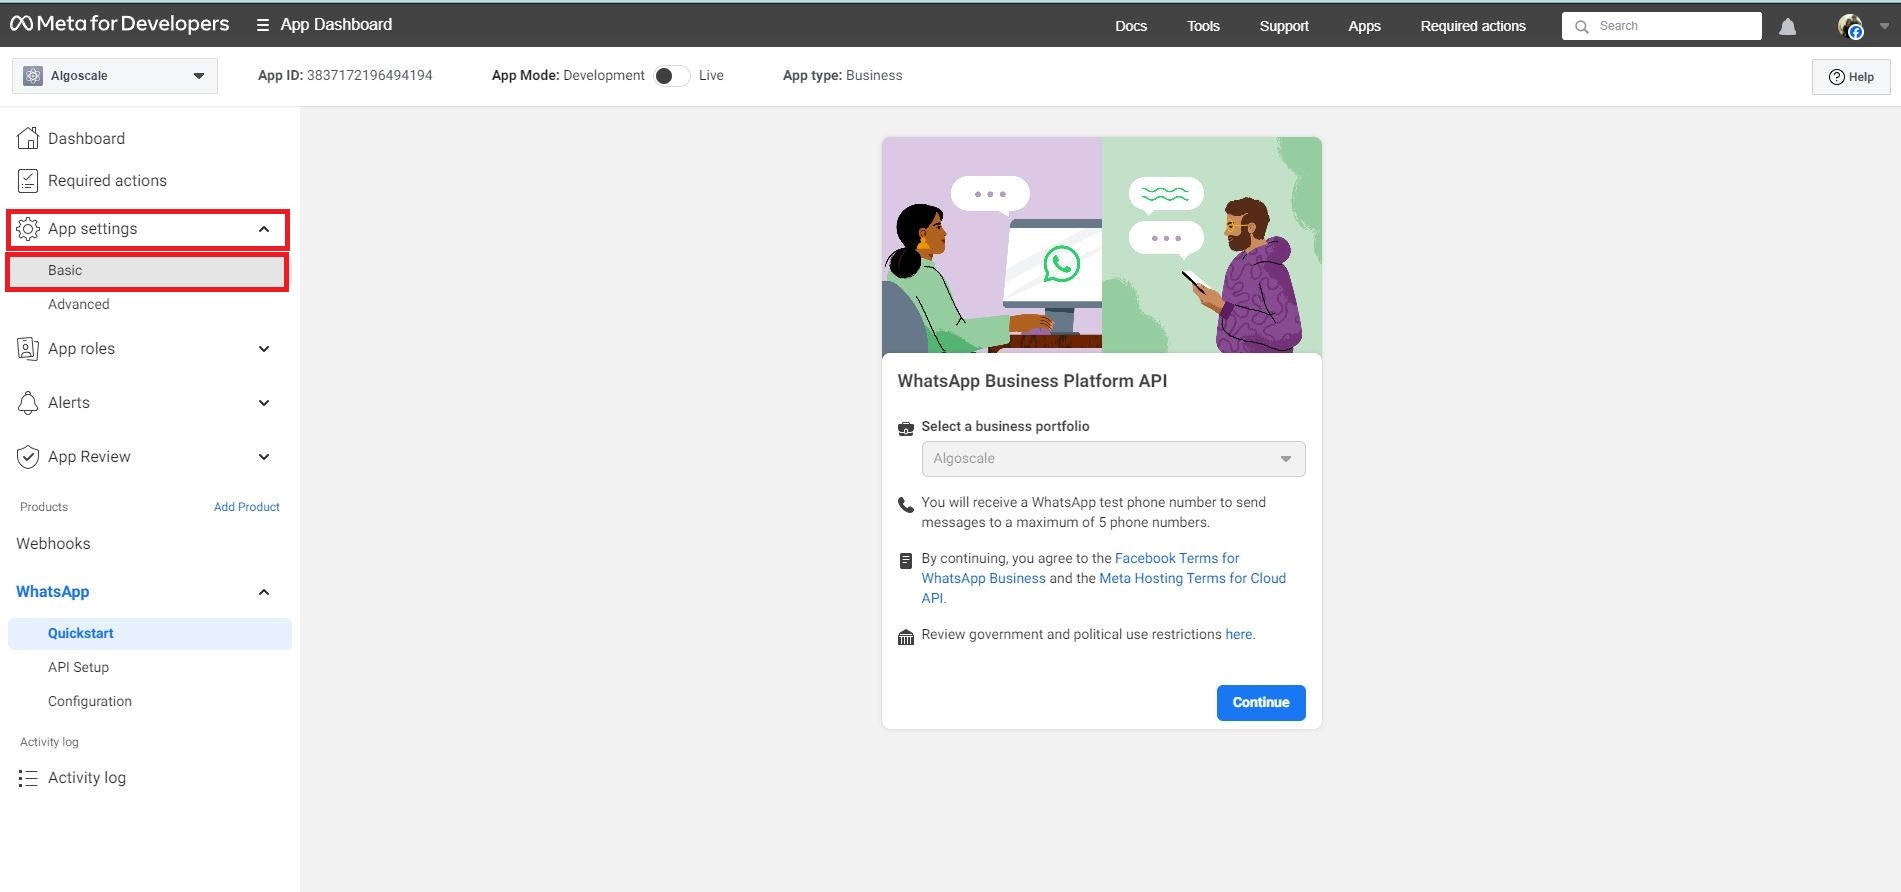
 8. Set Basic App Settings
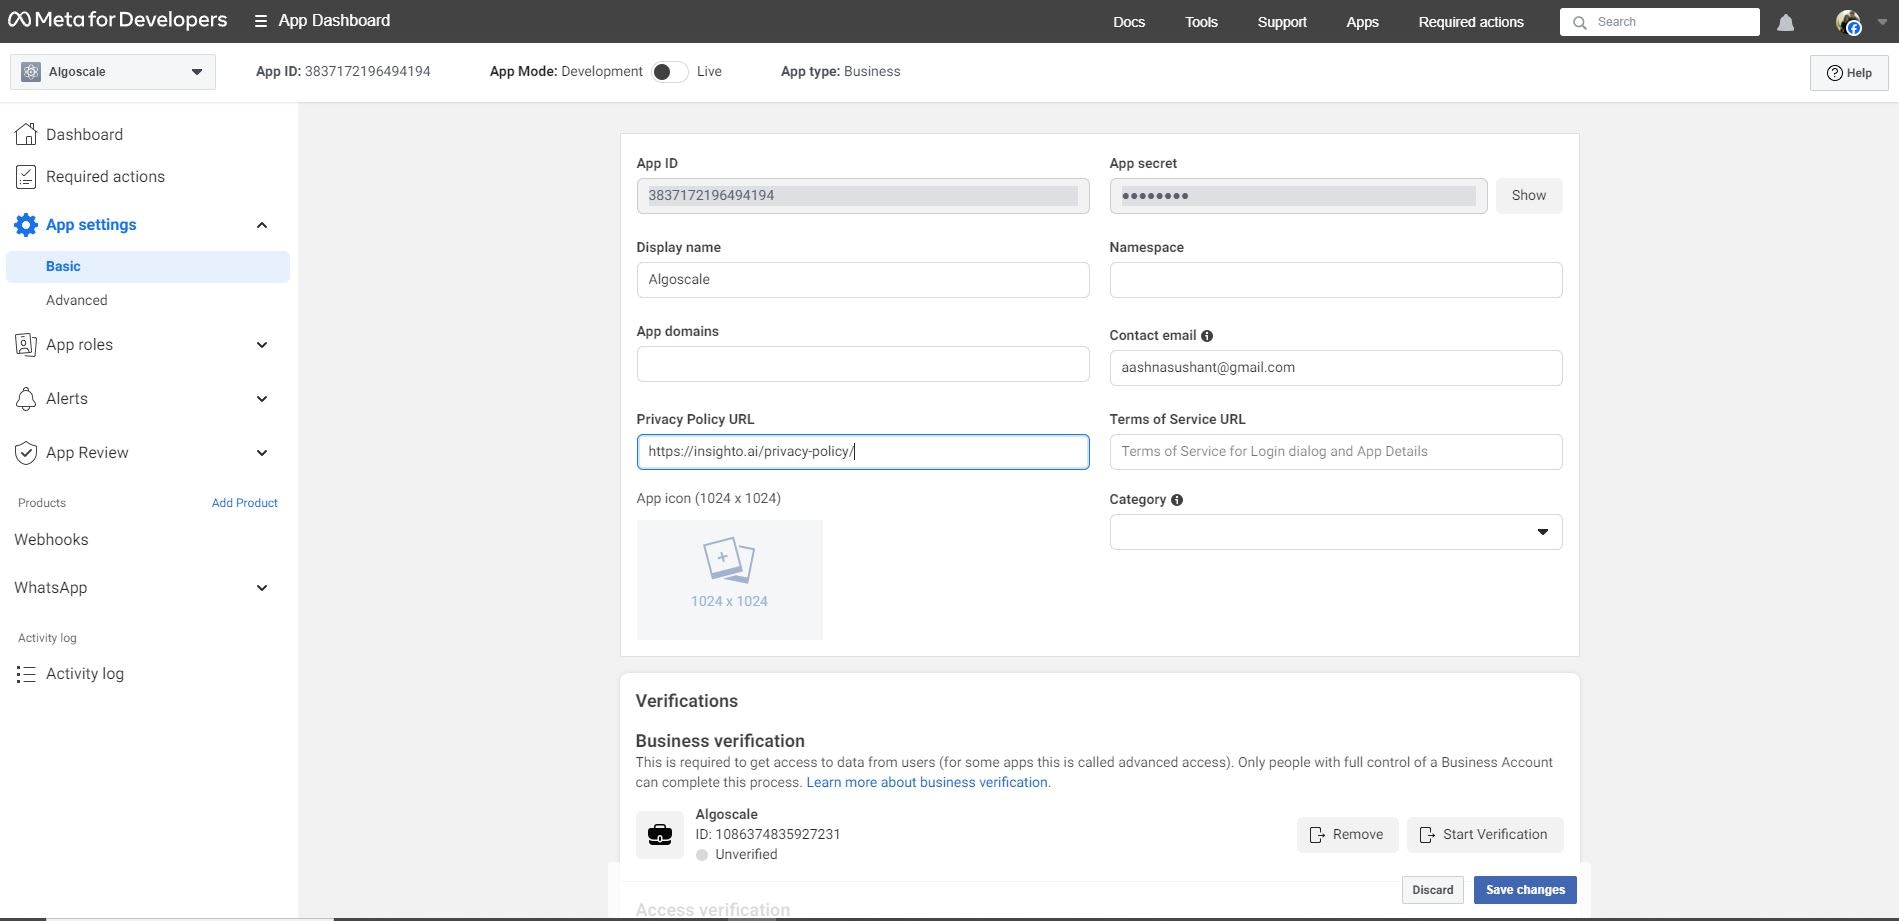
From the sidebar, go to App Settings > Basic.
Set the Privacy Policy URL to: [https://insighto.ai/privacy-policy/](https://insighto.ai/privacy-policy/)
Click “Save Changes.”
8. Set Basic App Settings
From the sidebar, go to App Settings > Basic.
Set the Privacy Policy URL to: [https://insighto.ai/privacy-policy/](https://insighto.ai/privacy-policy/)
Click “Save Changes.”
 9. Switch App Mode to Live
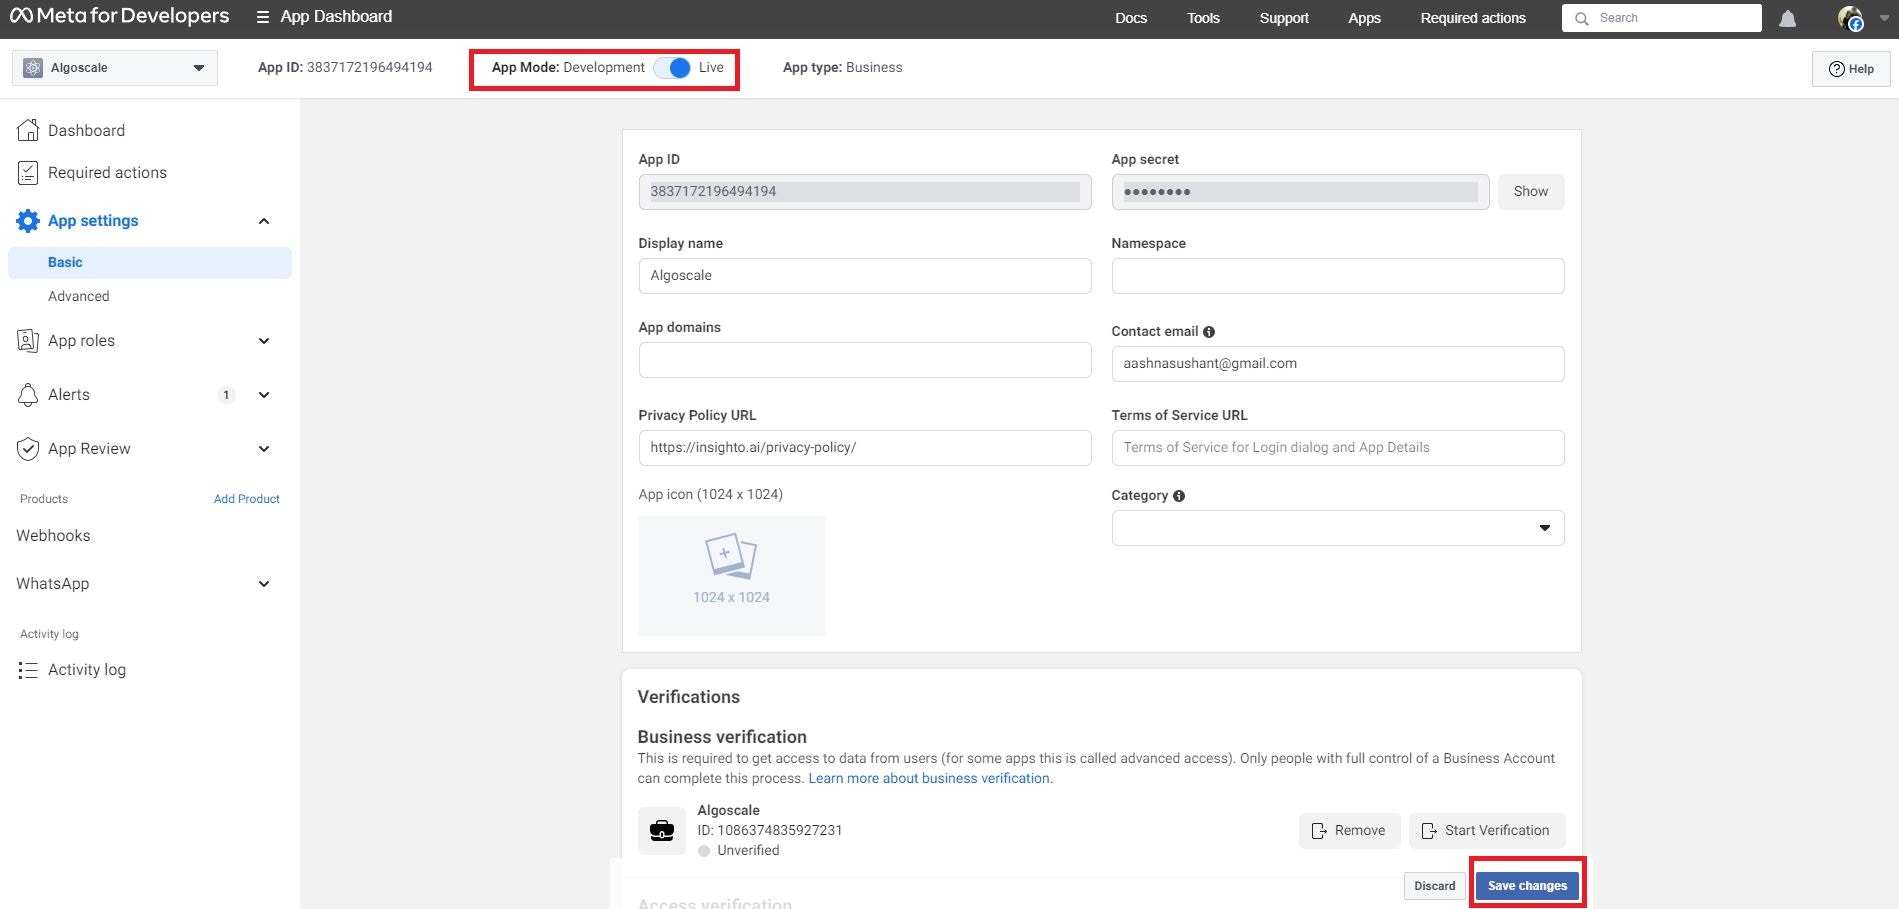
After saving changes, toggle the App Mode to Live (found at the top of the dashboard).
9. Switch App Mode to Live
After saving changes, toggle the App Mode to Live (found at the top of the dashboard).
 ## Generate a Permanent WhatsApp Access Token
10. Access Business Settings
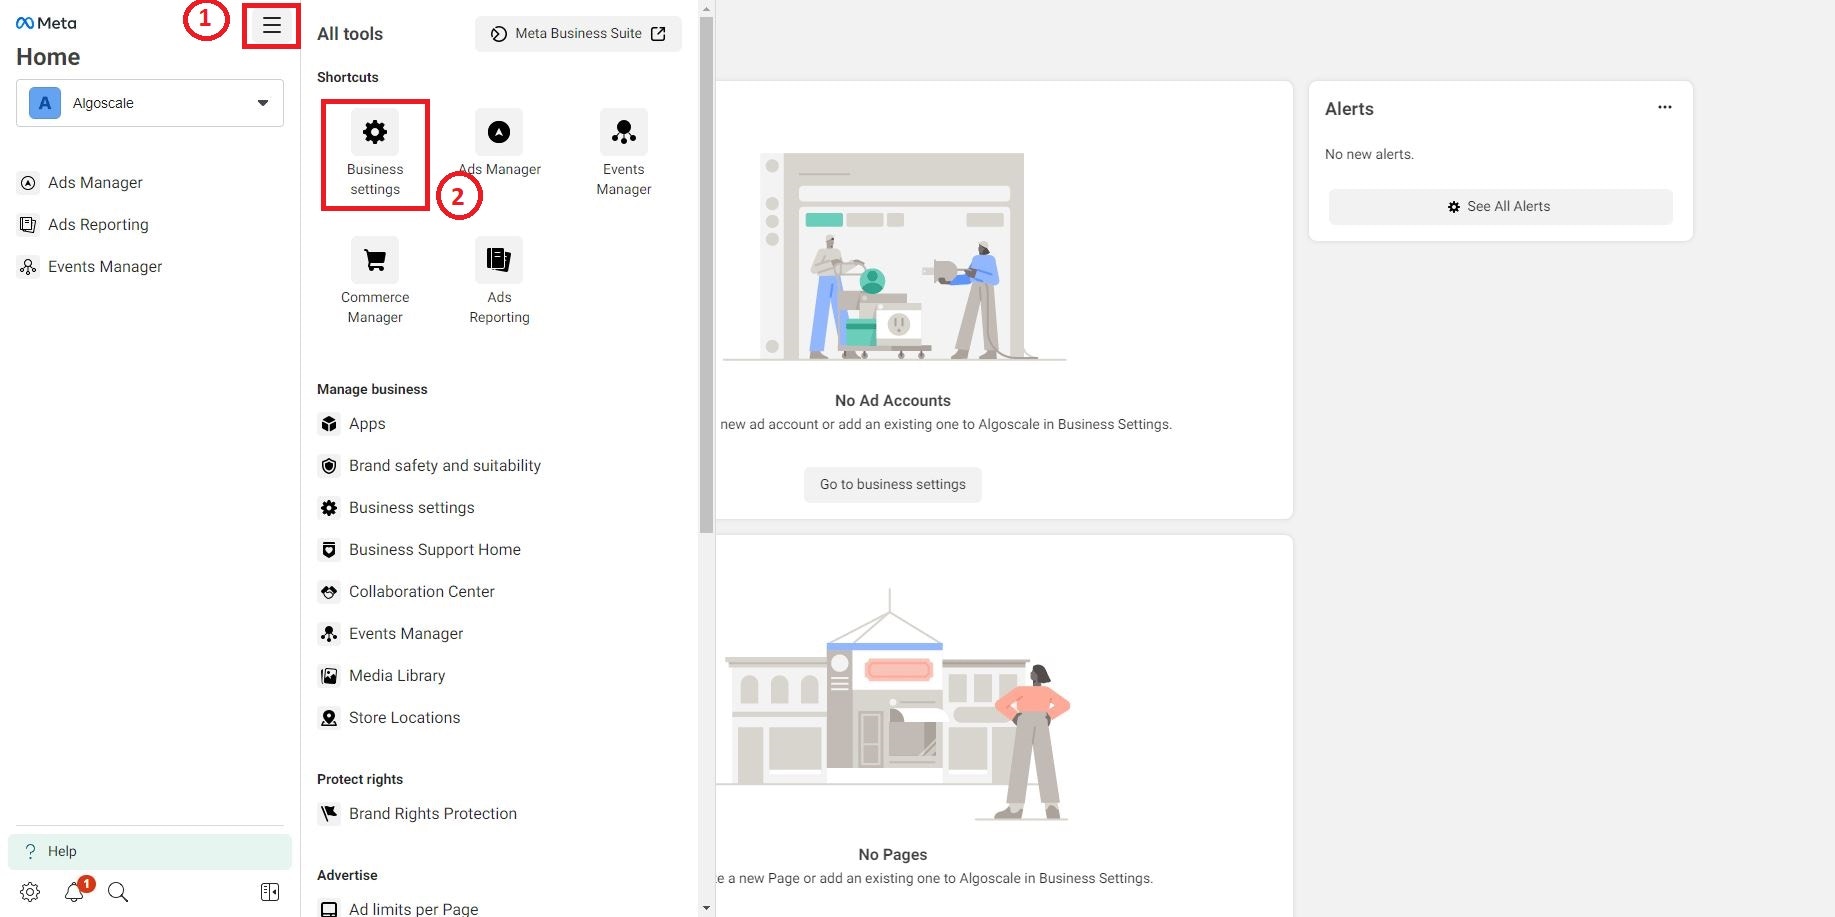
Go to [https://business.facebook.com/](https://business.facebook.com/), click the “All Tools” icon in the top-left corner, then select “Business Settings.”
## Generate a Permanent WhatsApp Access Token
10. Access Business Settings
Go to [https://business.facebook.com/](https://business.facebook.com/), click the “All Tools” icon in the top-left corner, then select “Business Settings.”
 11. Create a System User
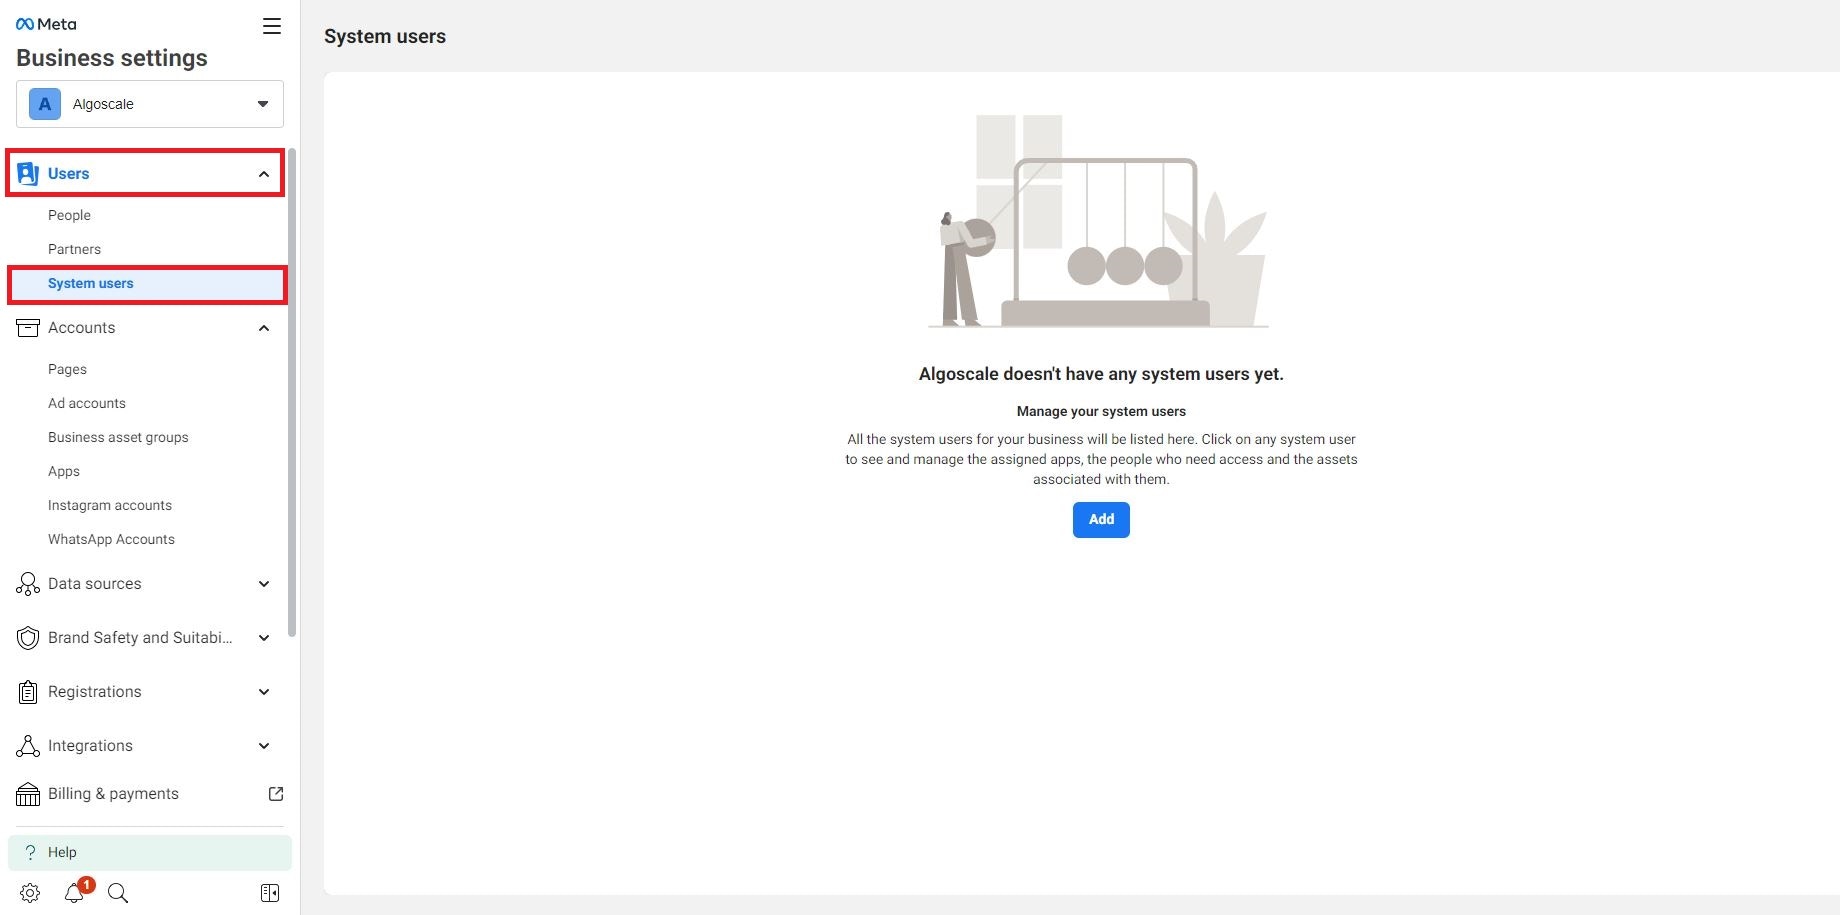
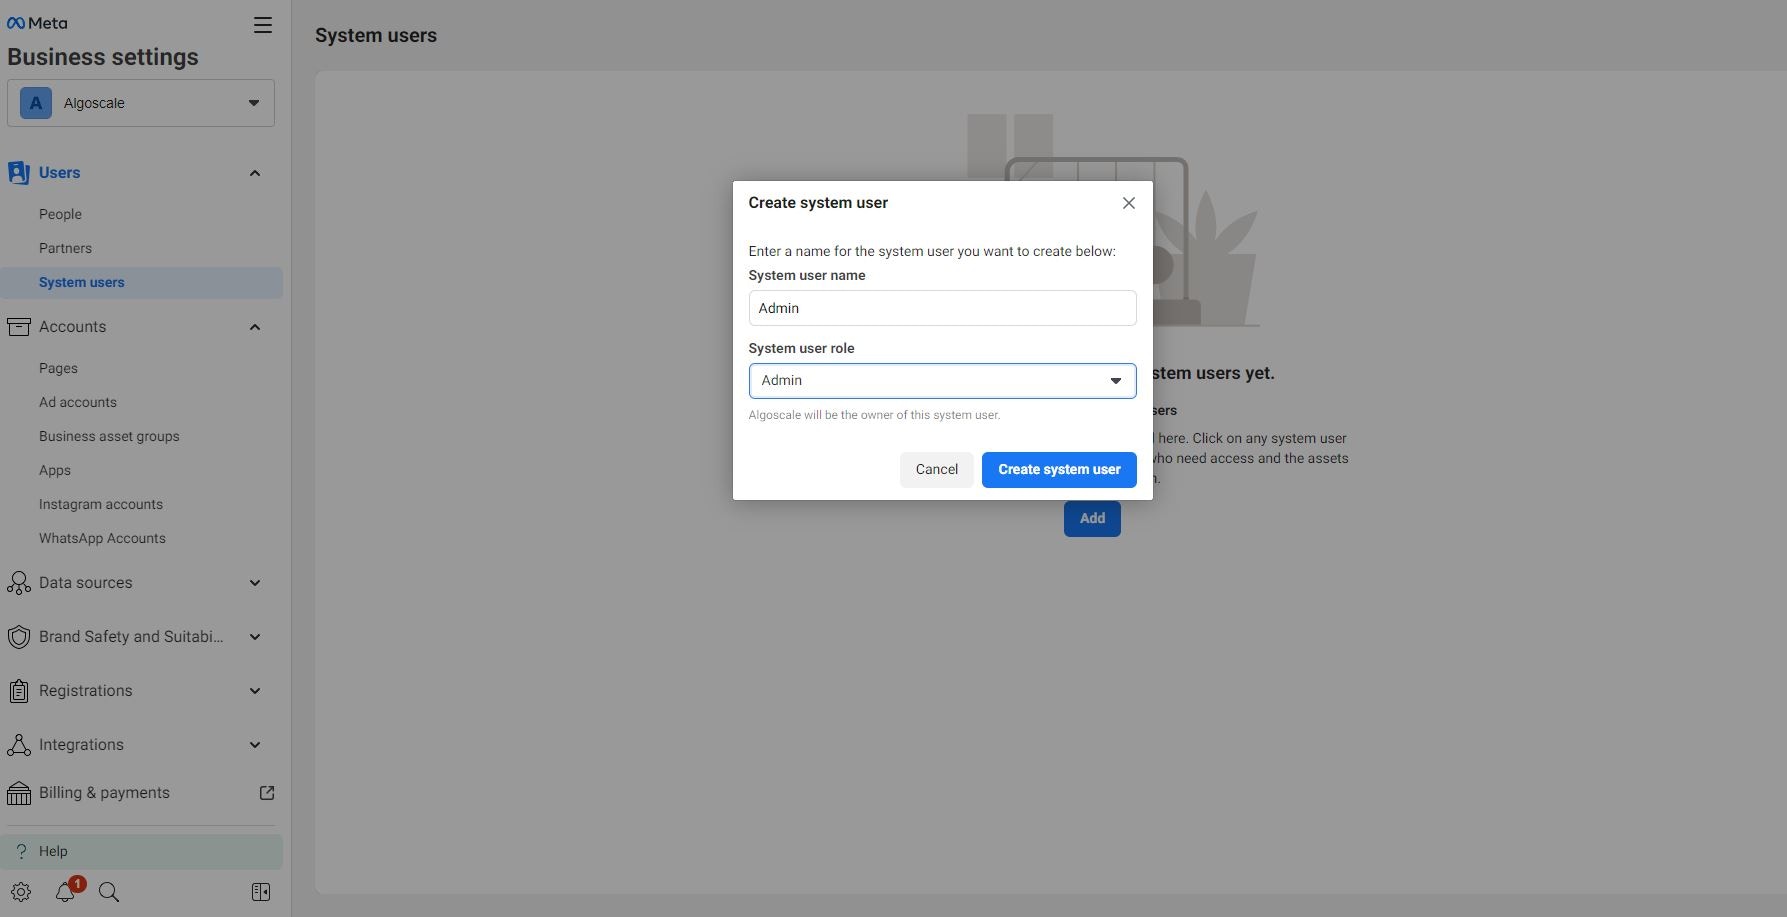
In the left sidebar, navigate to Users > System Users, then click “Add”, enter a name, choose Admin, and click “Create System User.”
11. Create a System User
In the left sidebar, navigate to Users > System Users, then click “Add”, enter a name, choose Admin, and click “Create System User.”
 12. Assign Assets to the System User
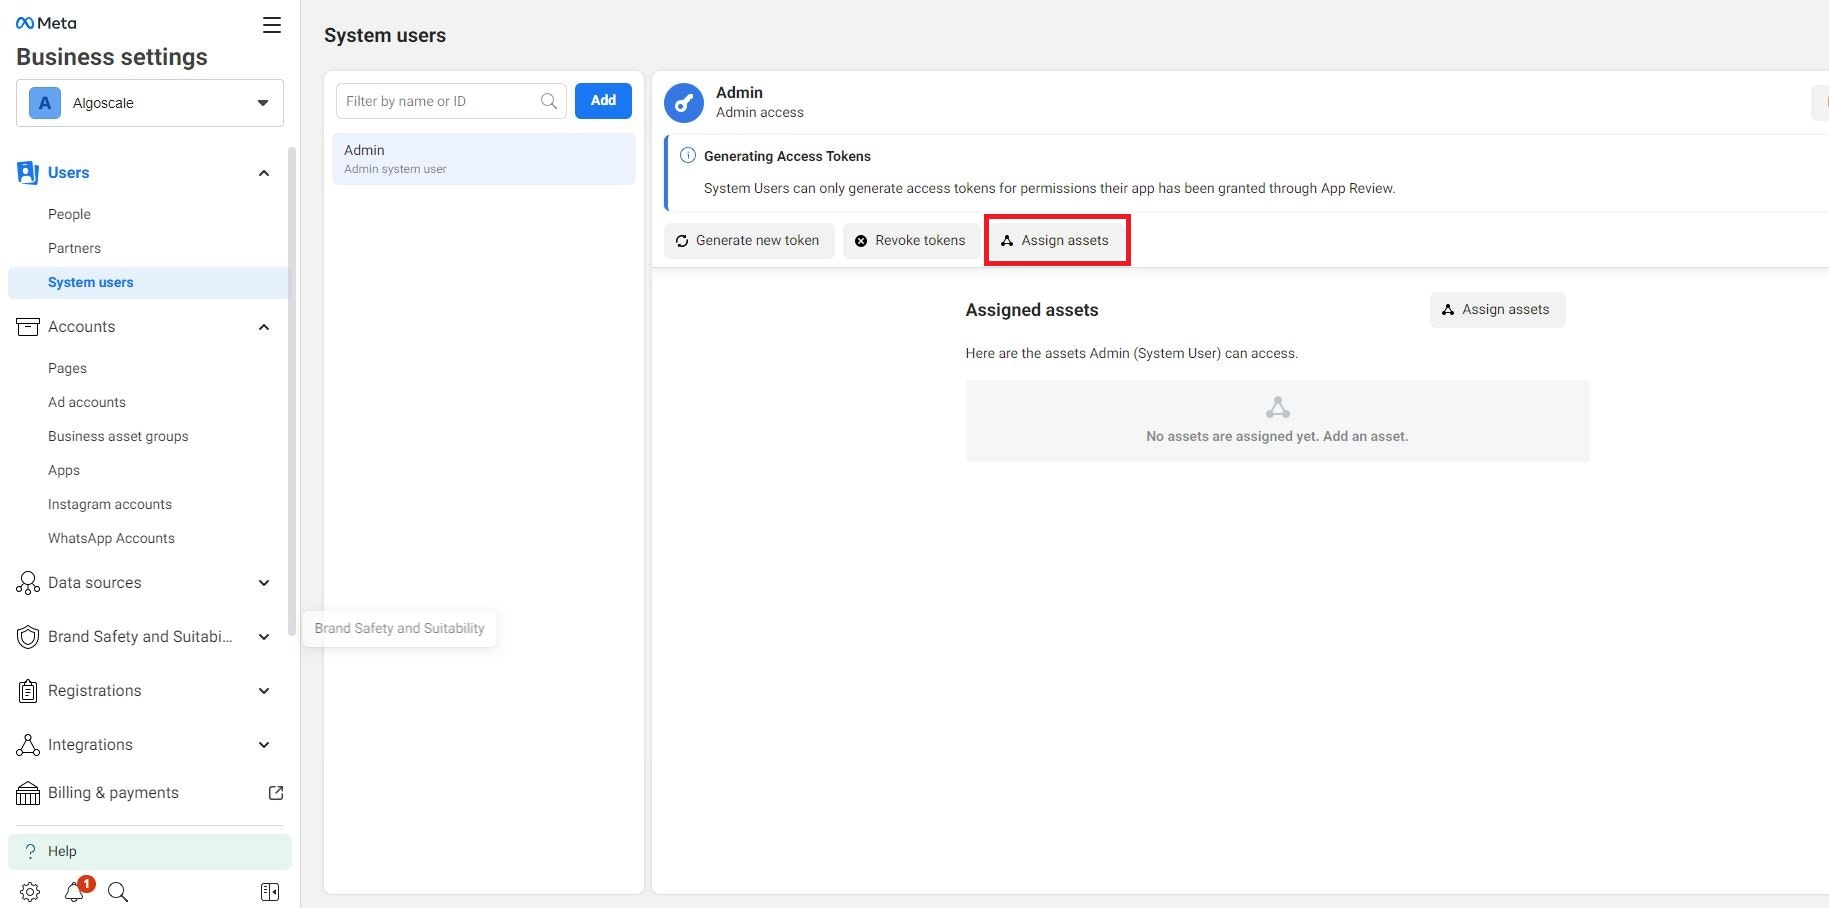
Now that you have created the system user, it’s time to assign assets. Click on “Assign Assets.”
12. Assign Assets to the System User
Now that you have created the system user, it’s time to assign assets. Click on “Assign Assets.”
 13. Grant App Permissions
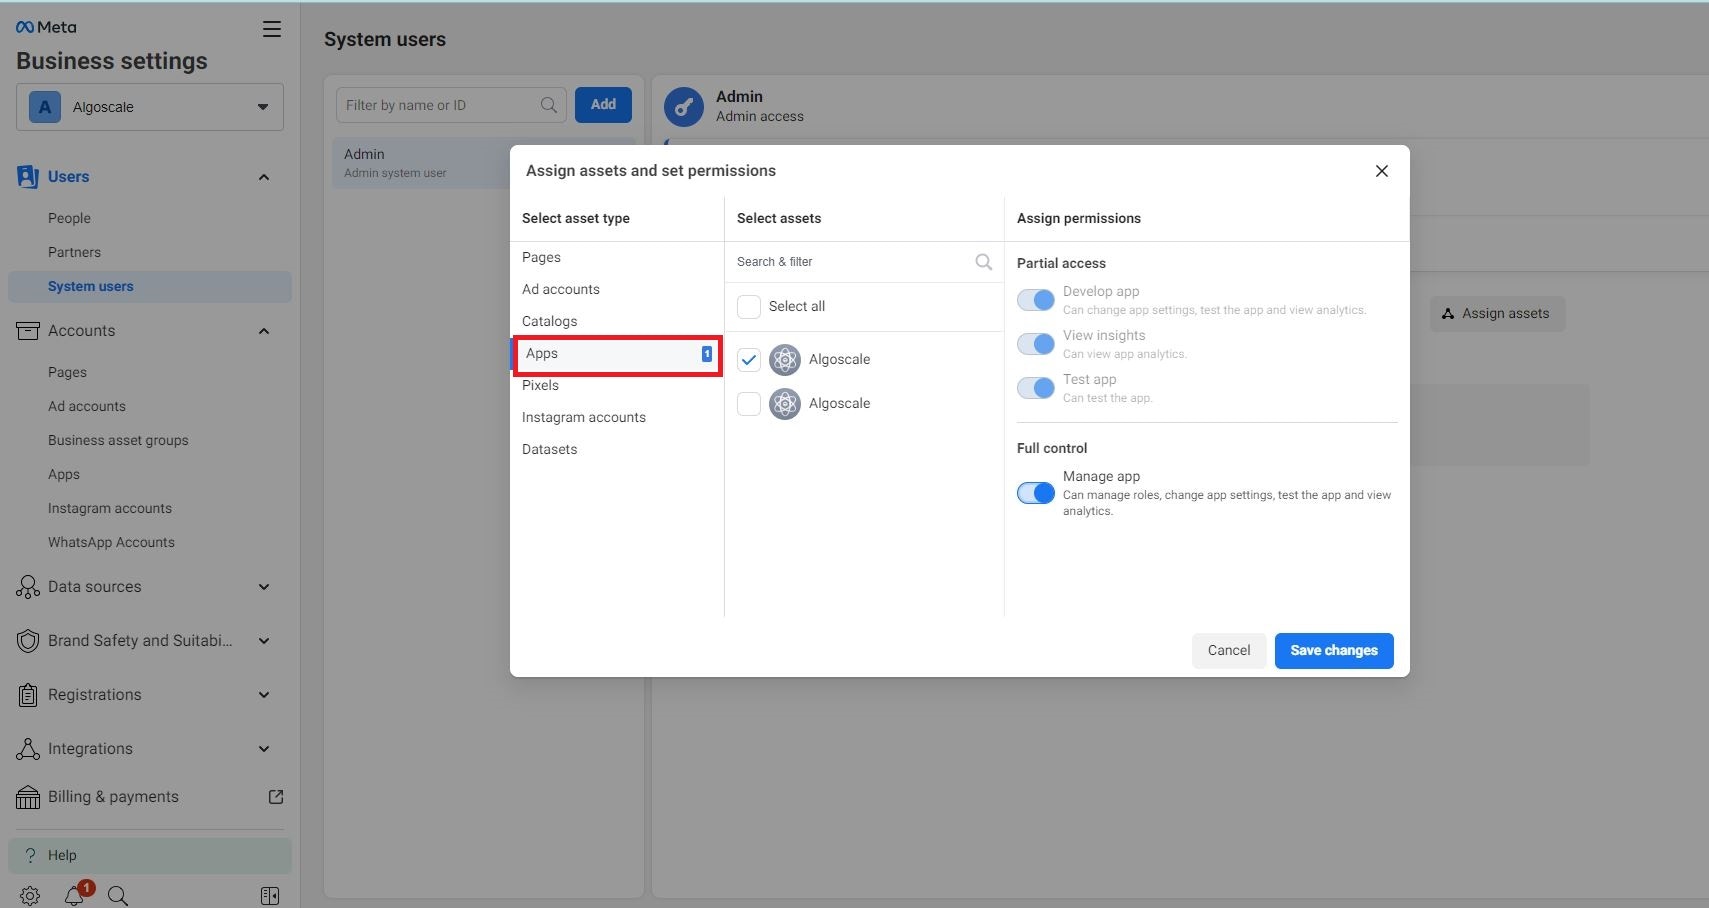
Go to Apps > Your app name. Choose the app and grant full access to manage every aspect of the app. Click “Save Changes.”
13. Grant App Permissions
Go to Apps > Your app name. Choose the app and grant full access to manage every aspect of the app. Click “Save Changes.”
 14. Open the Token Generator
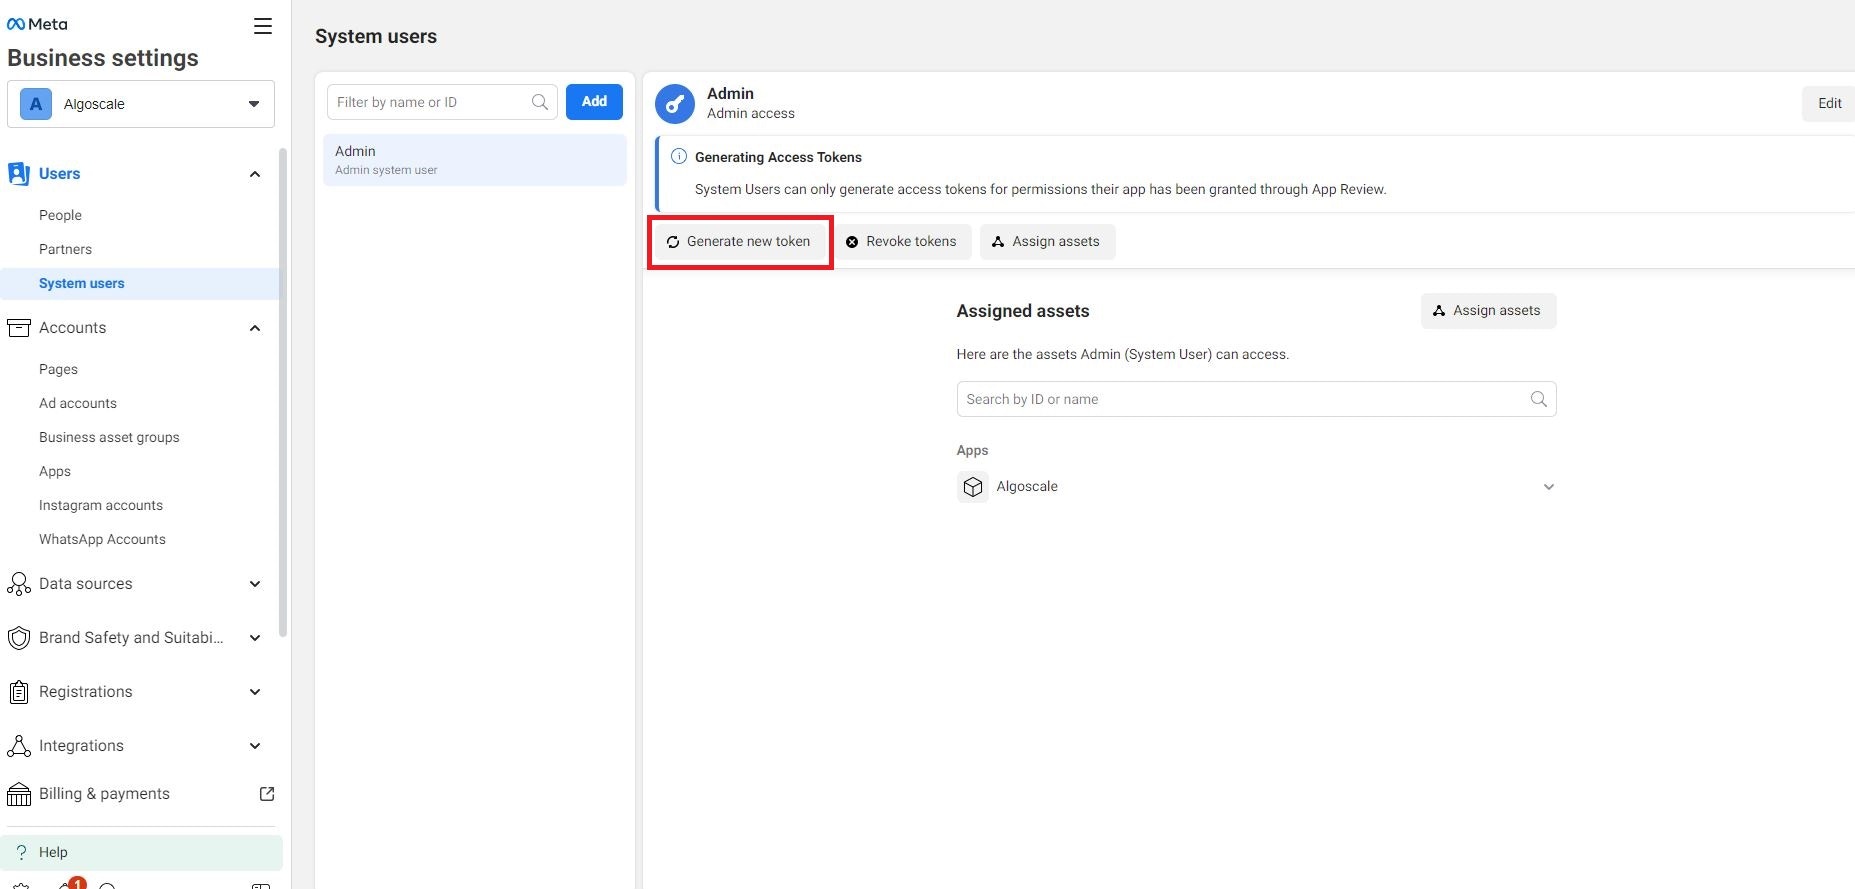
Click on the “Generate new token” button next to the system user.
14. Open the Token Generator
Click on the “Generate new token” button next to the system user.
 15. Configure and Save the Token
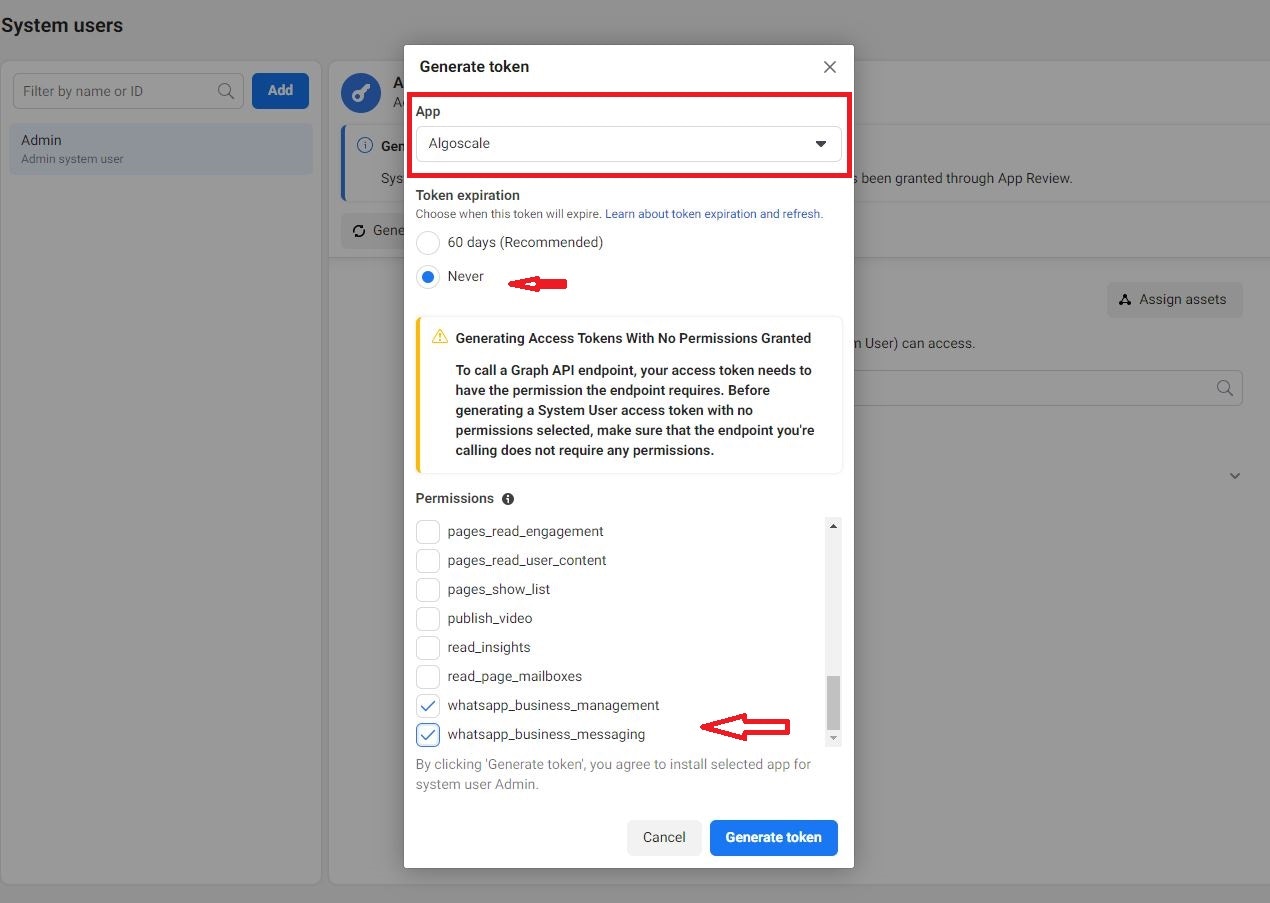
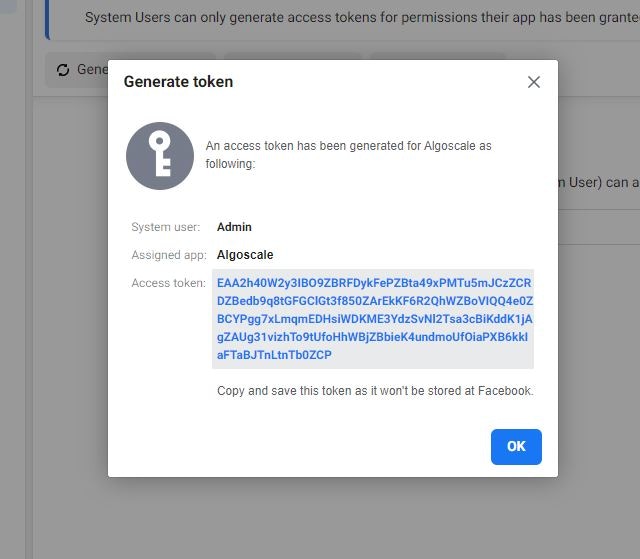
In the token prompt, select your app, set the token expiration to Never, choose the permissions `whatsapp_business_management` and `whatsapp_business_messaging`, then click “Generate Token.” Finally, copy and securely store the generated token.
15. Configure and Save the Token
In the token prompt, select your app, set the token expiration to Never, choose the permissions `whatsapp_business_management` and `whatsapp_business_messaging`, then click “Generate Token.” Finally, copy and securely store the generated token.
 16. Add a Phone Number for WhatsApp
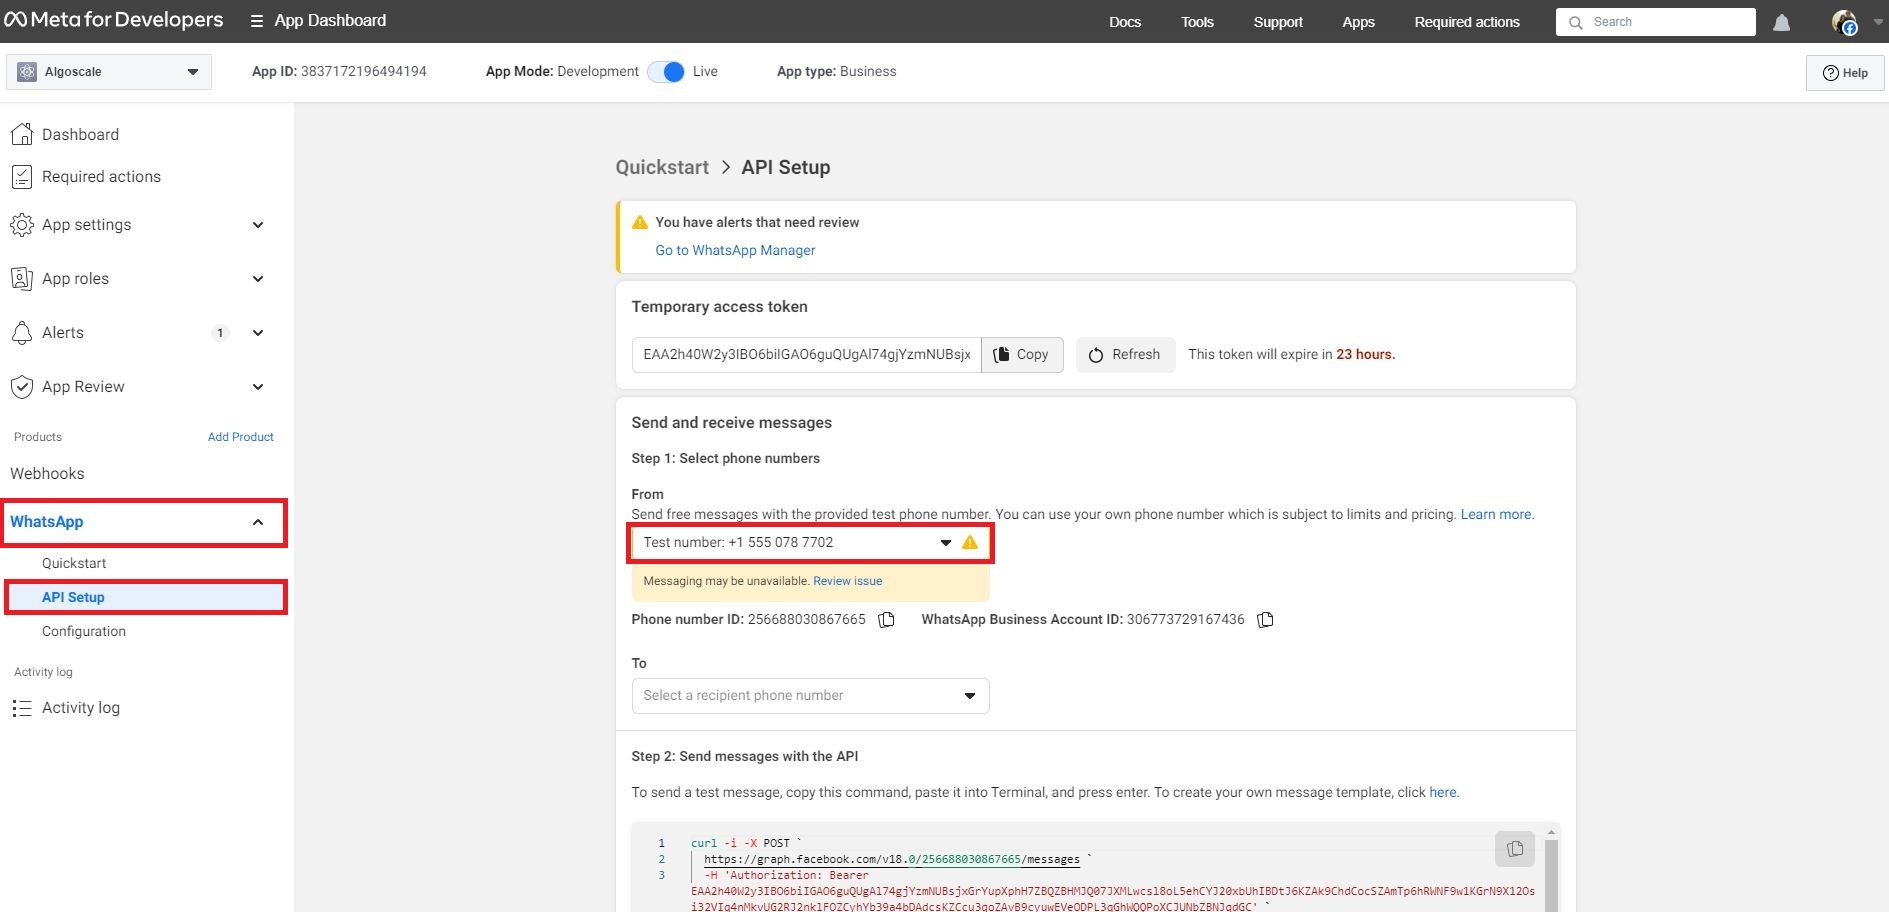
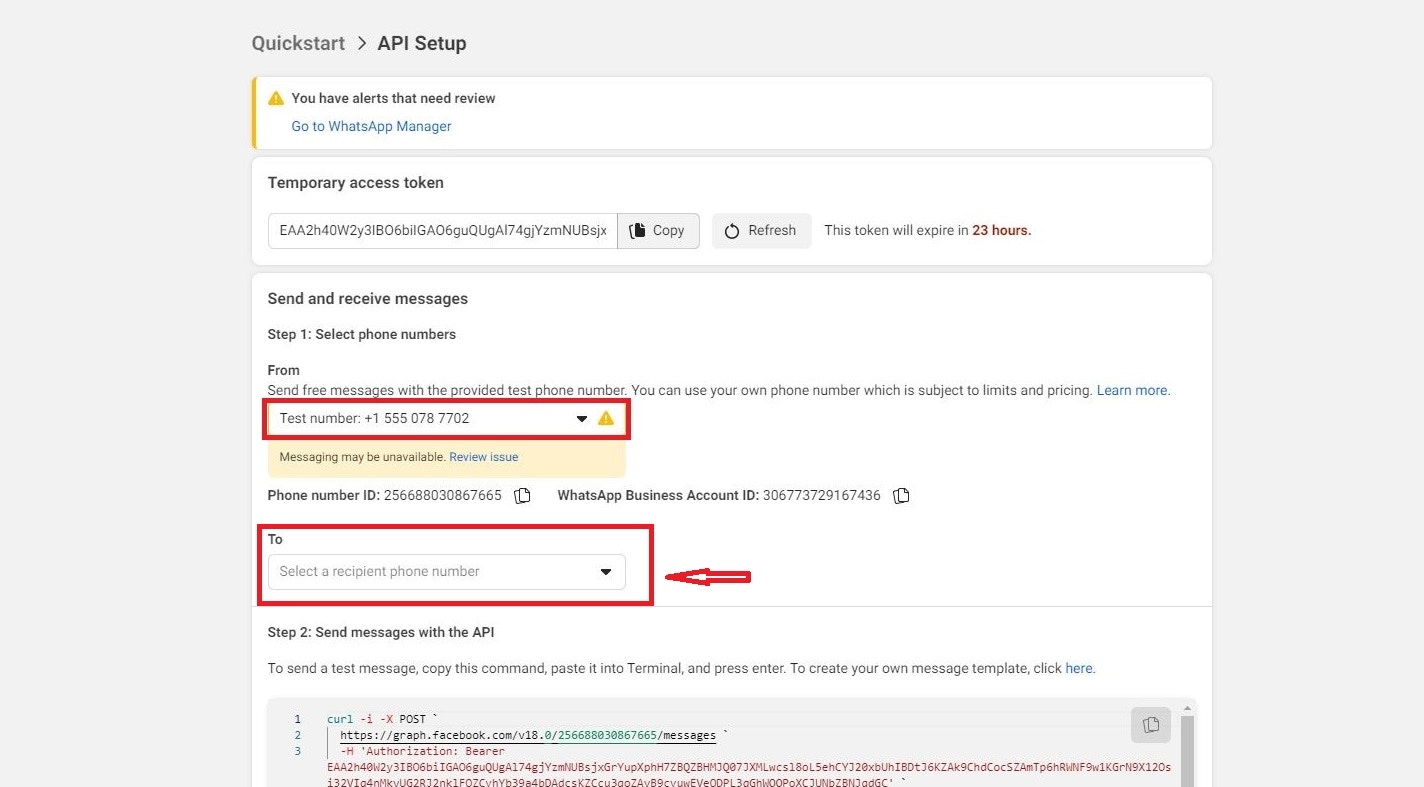
Return to the Developer Dashboard , then go to WhatsApp > API Setup from the sidebar.
You can either use your own phone number or the provided test number.
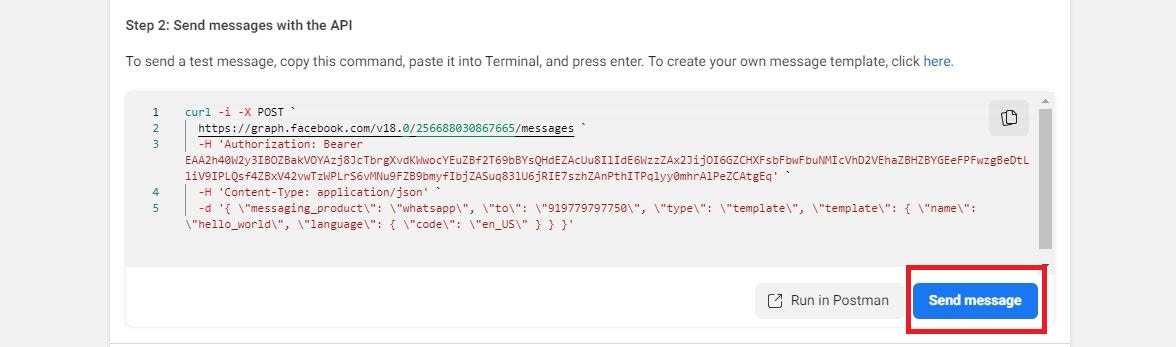
If you choose the test number, enter a test under Step 2 and click “Send Message” to verify successful message delivery.
16. Add a Phone Number for WhatsApp
Return to the Developer Dashboard , then go to WhatsApp > API Setup from the sidebar.
You can either use your own phone number or the provided test number.
If you choose the test number, enter a test under Step 2 and click “Send Message” to verify successful message delivery.
 17. Register a Phone Number
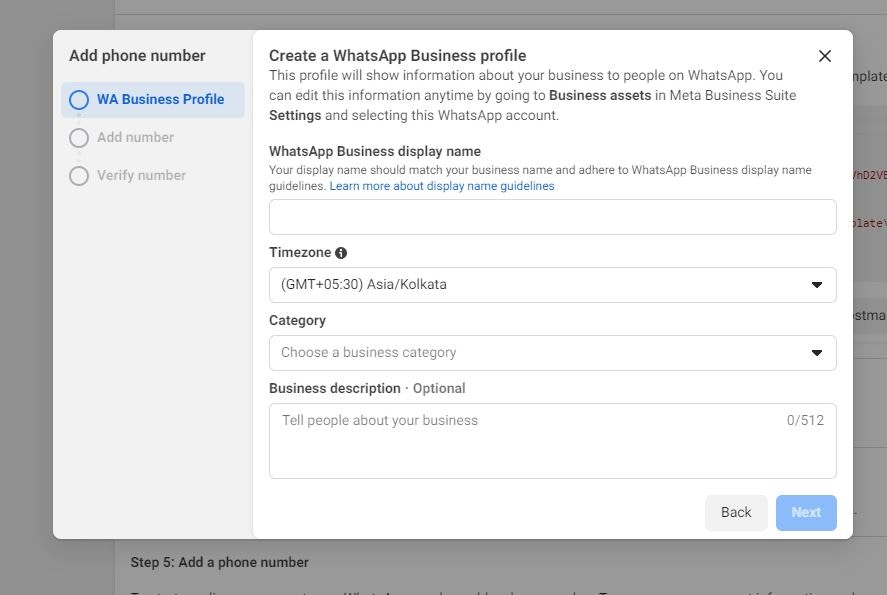
Proceed to Step 5: Add a Phone Number, then complete the registration form by providing all the required details.
17. Register a Phone Number
Proceed to Step 5: Add a Phone Number, then complete the registration form by providing all the required details.

 18. Add a Payment Method
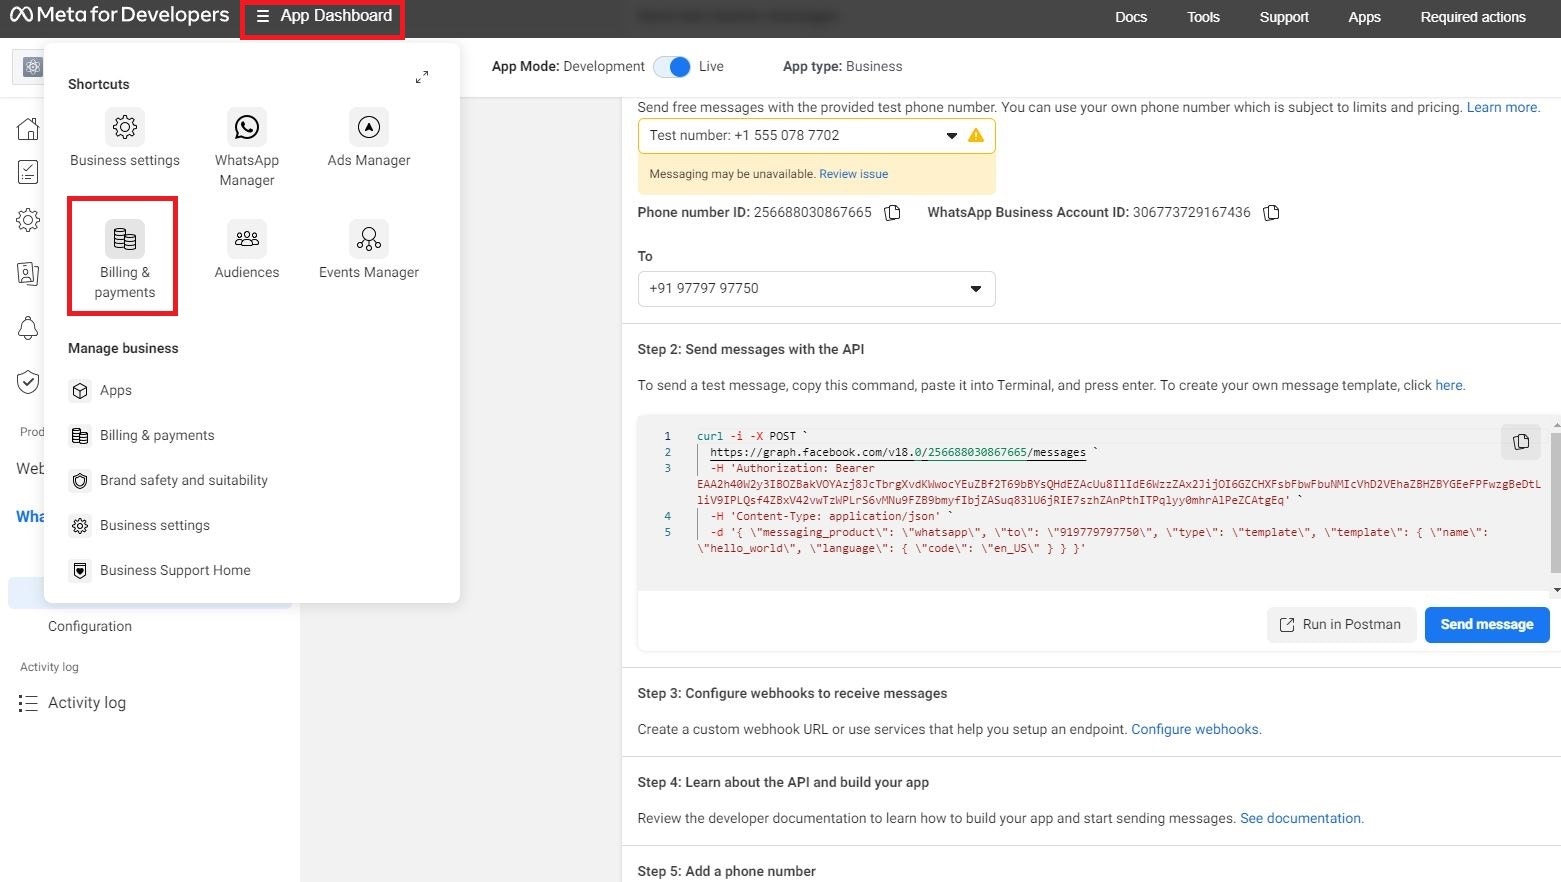
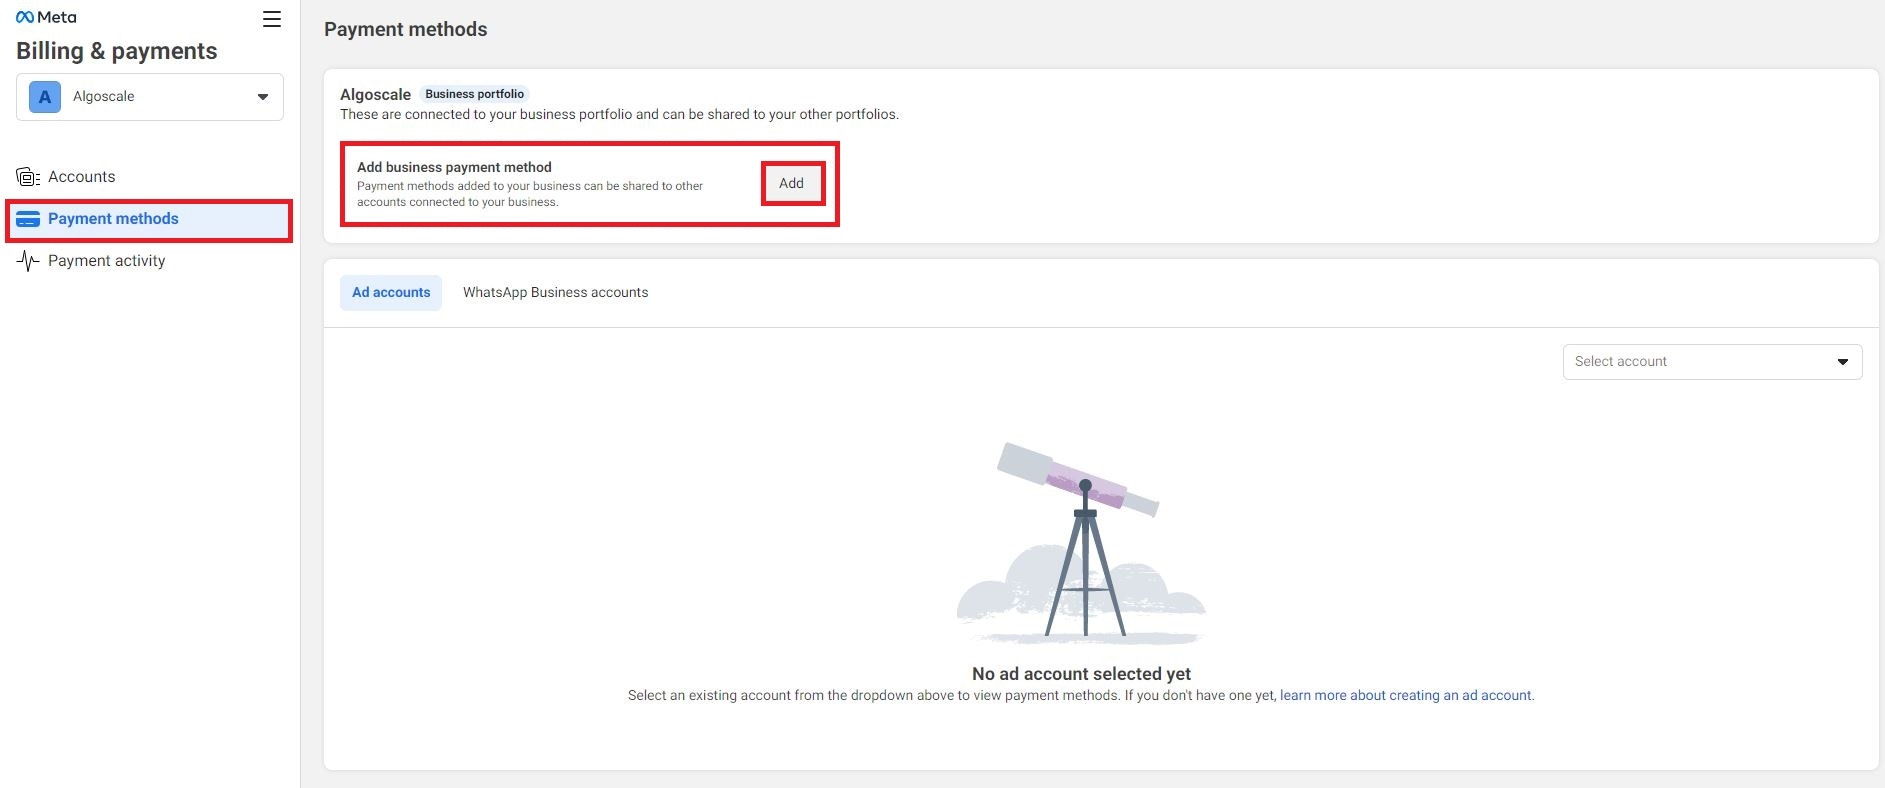
In the App Dashboard, go to Billing & Payments.
Click “Payment Methods” > “Add Business Payment Method.”
Enter your credit or debit card information and save.
You will only be able to send messages via WhatsApp when you add a valid payment method.
18. Add a Payment Method
In the App Dashboard, go to Billing & Payments.
Click “Payment Methods” > “Add Business Payment Method.”
Enter your credit or debit card information and save.
You will only be able to send messages via WhatsApp when you add a valid payment method.
 ## Configure the WhatsApp API Webhook Settings
19. Set the Webhook URL and Verification Token
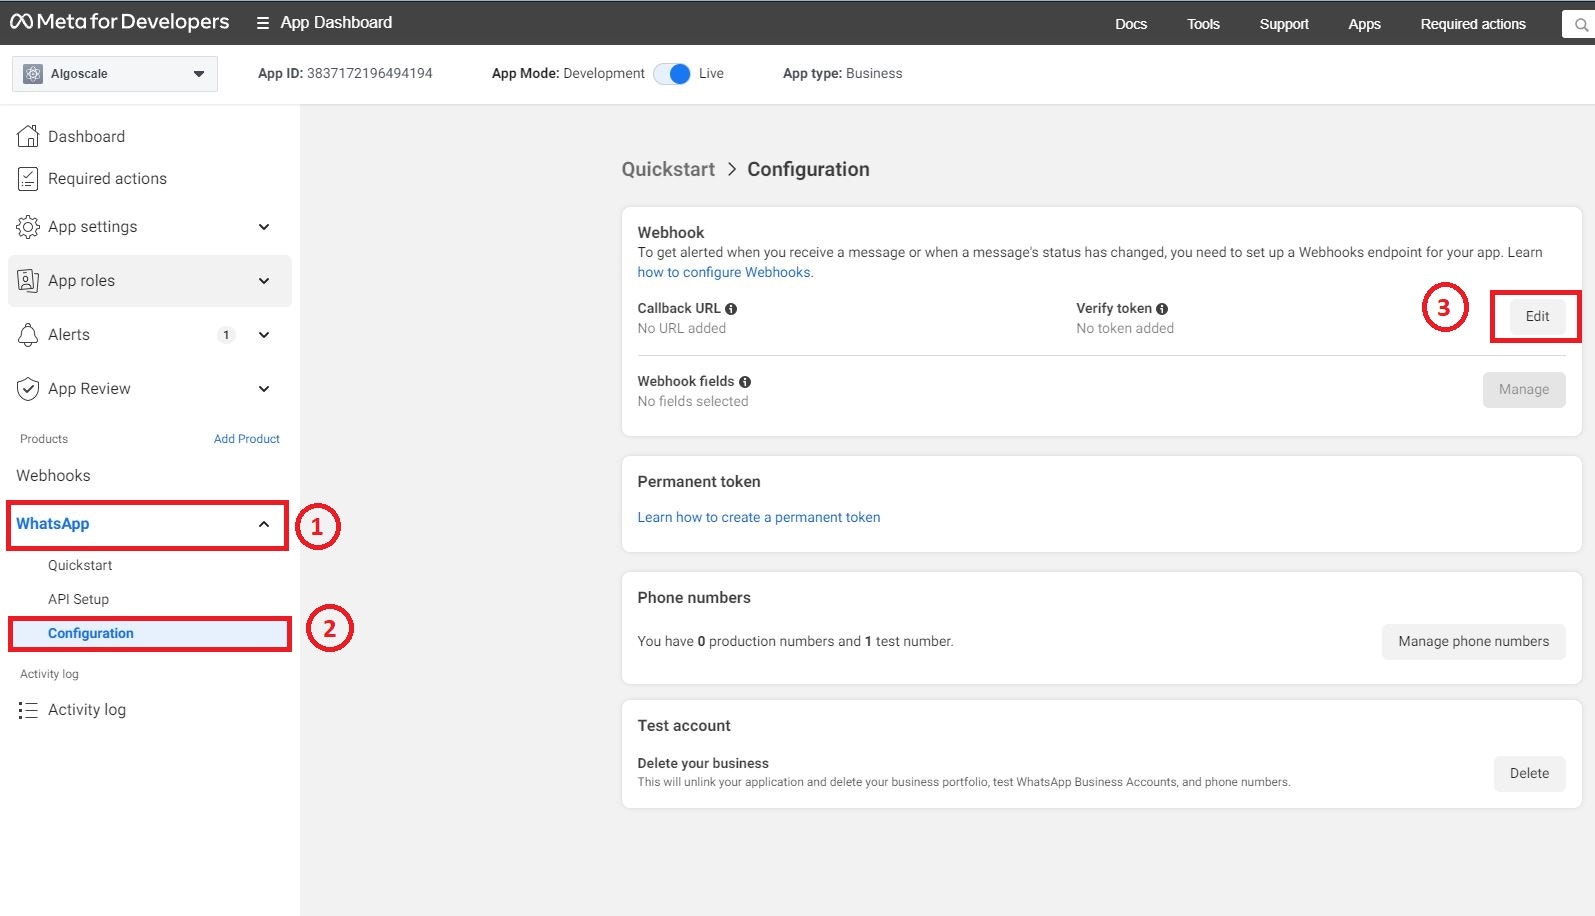
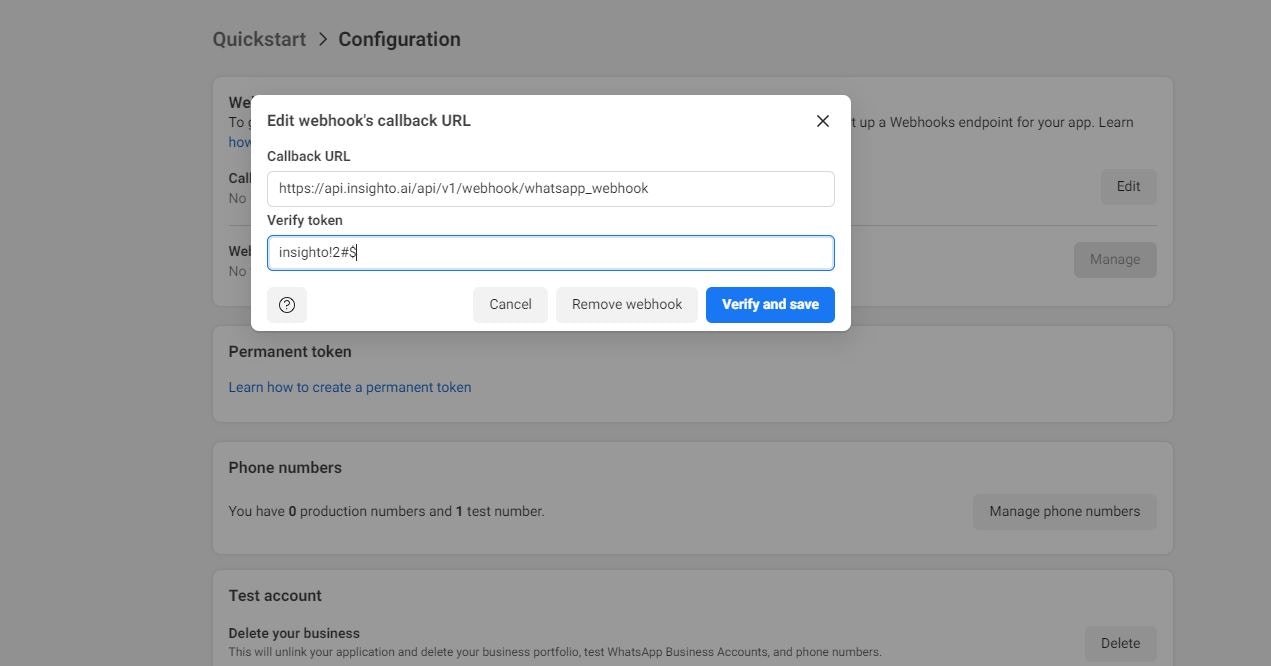
In the Developer Dashboard, go to WhatsApp > Configuration from the sidebar. Under Webhook, click “Edit.”
Enter the following:
* Callback URL: [https://api.insighto.ai/api/v1/webhook/whatsapp\_webhook](https://api.insighto.ai/api/v1/webhook/whatsapp_webhook)
* Verification Token: insighto!2#\$
Click “Verify and Save.”
## Configure the WhatsApp API Webhook Settings
19. Set the Webhook URL and Verification Token
In the Developer Dashboard, go to WhatsApp > Configuration from the sidebar. Under Webhook, click “Edit.”
Enter the following:
* Callback URL: [https://api.insighto.ai/api/v1/webhook/whatsapp\_webhook](https://api.insighto.ai/api/v1/webhook/whatsapp_webhook)
* Verification Token: insighto!2#\$
Click “Verify and Save.”
 20. Subscribe to Webhook Fields
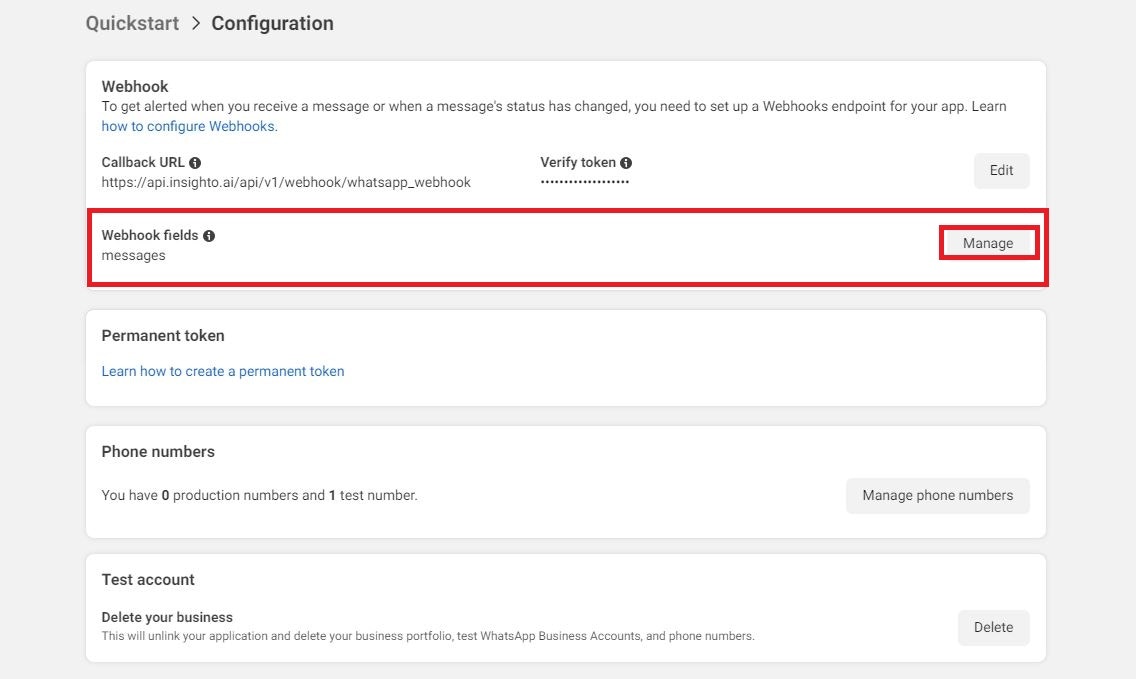
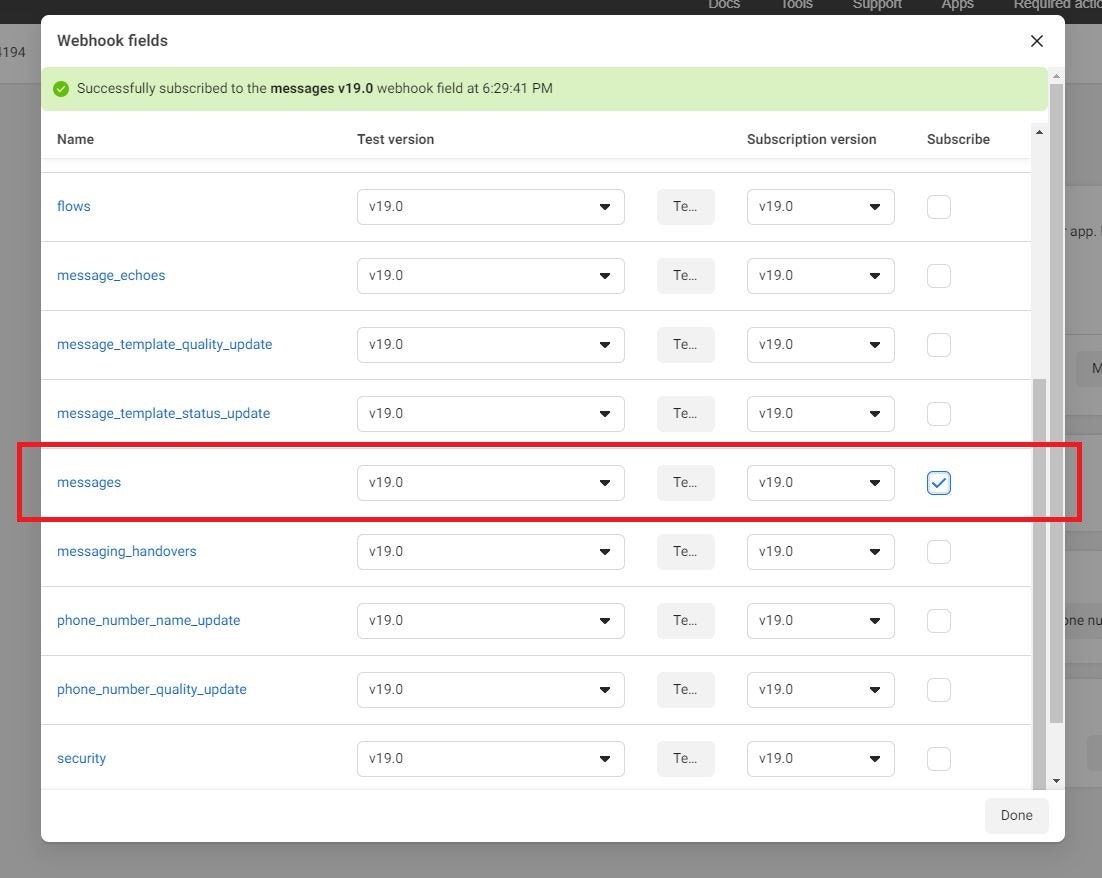
Under the Webhook Fields section, click “Manage.” Locate the “messages” field and check the box to subscribe to it.
20. Subscribe to Webhook Fields
Under the Webhook Fields section, click “Manage.” Locate the “messages” field and check the box to subscribe to it.
 ## Generate Your Facebook App Secret
21: Access App Settings and Copy the Secret Code
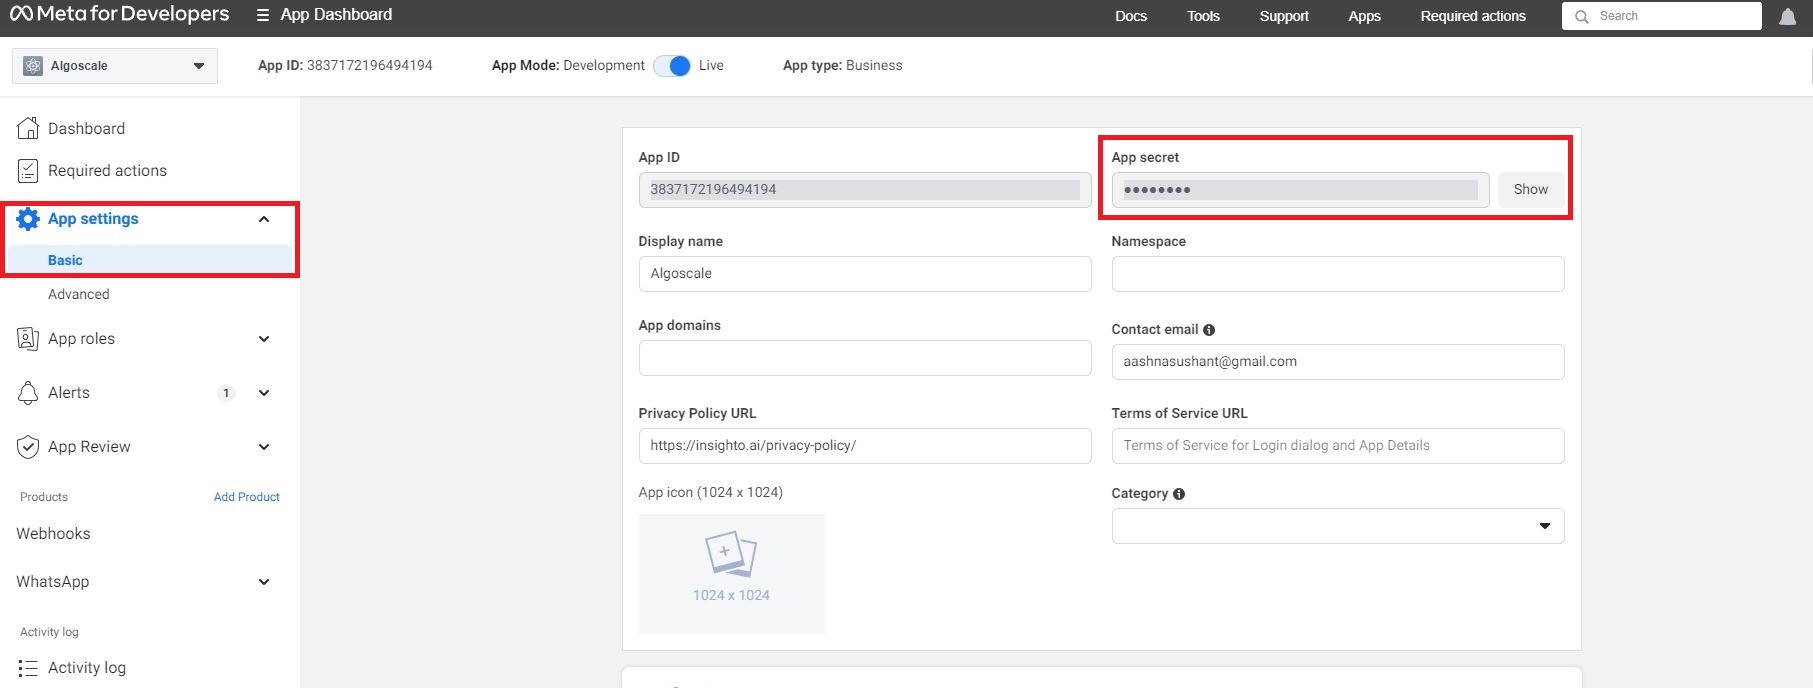
In the WhatsApp Developer dashboard, go to App Settings > Basic.
Click on the “Show” button. Copy the App Secret code and store it securely.
## Generate Your Facebook App Secret
21: Access App Settings and Copy the Secret Code
In the WhatsApp Developer dashboard, go to App Settings > Basic.
Click on the “Show” button. Copy the App Secret code and store it securely.
 ***
## Prepare for WhatsApp Integration with Insighto.ai
Gather all the required information from the previous steps. Once collected, follow the next guide to complete the WhatsApp integration with Insighto.ai.
***
## Prepare for WhatsApp Integration with Insighto.ai
Gather all the required information from the previous steps. Once collected, follow the next guide to complete the WhatsApp integration with Insighto.ai.